Learn Access Now! Chapter 14 Next Section in Chapter 15 Chapter 16
Chapter 15: Importing and Exporting Information
(This is section 1 of 3 in this chapter)
One of the marks of a good neighbor is a willingness to cooperate with those around you. Access is a good neighbor--using Access import and export capabilities, you can easily share information with virtually any other program you can think of. In this chapter, you will learn how to use those capabilities.
By the time you finish this chapter, you will understand the following key concepts:
- What data importing is
- What types of files Access can import
- How to import a file
- What data exporting is
- What types of files Access can export
- How to export a database object
Using Information from Other Databases
There are many different database programs on the market, and it is not unreasonable to expect that some of these other programs have been used to accumulate quite a bit of data. If you have some of this older data, you may want to convert it to an Access format. Also, you may need to work with data stored in a different format by someone else in your company or by one of your clients. Regardless of the reason why you have data in a different format, Access will let you import information from a variety of formats into an Access database.
Importing data is the process of combining information from an external source (such as a dBASE file) with information in the current database. To import data, you must already have an Access database open; this is where Access will place the imported data. You also need to know the format of the data you plan to import.
Picking a Source Format
To import data into an open database, choose Get External Data from the File menu. This displays a submenu from which you should choose the Import option. Access, in turn, displays the Import dialog box, as shown in Figure 15-1.

Figure 15-1 Picking a source file.
The Import dialog box is very similar to the standard Open dialog box used by Access. Perhaps the most important feature, however, is the Files Of Type pull-down list at the bottom of the dialog box. Using this pull-down list, you can specify which types of files Access should show in the rest of the dialog box. Table 15-1 shows the various choices you can make with the pull-down list.
| Option | Meaning | |
|---|---|---|
| Microsoft Access | Source is another Access database | |
| Text Files | Source is a text file | |
| Microsoft Excel | Source is an Excel spreadsheet | |
| Exchange | Source is a Microsoft Exchange address book | |
| Outlook | Source is a Microsoft Outlook address book | |
| Lotus 1-2-3 | Source is a Lotus 1-2-3 file | |
| Lotus 1-2-3/DOS | Source is a Lotus 1-2-3 file from a DOS version of the program | |
| Paradox | Source is a Paradox database file | |
| HTML Documents | Source is a Web page | |
| dBASE III | Source is a database created in dBASE III format | |
| dBASE IV | Source is a database created in dBASE IV format | |
| dBASE 5 | Source is a database created in dBASE 5 format | |
| ODBC Databases | Source is any database that utilizes ODBC |
Table 15-1 Import format selections supported by Access.
Select the option that corresponds to your source data. If you don't know, you may need to ask whoever gave you the data. After you select a source format, use the controls in the rest of the dialog box to select the file you want to convert. When you are ready to proceed, click your mouse on the Import button.
The dialog boxes you see from this point forward will depend on the type of source file you are importing.
Importing Access Files
Access lets you import objects from another Access database. If you are importing an Access file, you will see the Import Objects dialog box, as shown in Figure 15-2.
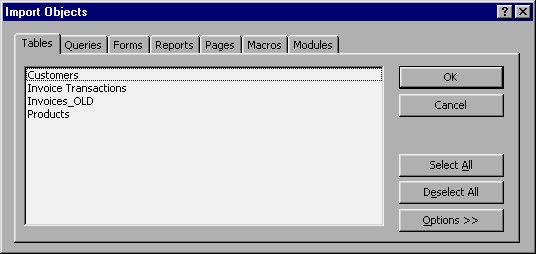
Figure 15-2 Importing Access objects.
You use this dialog box to specify which objects you want to import. As mentioned earlier, you can specify any type of database object you want. All you need to do is click on one of the tabs that represents the category of object you want to import. The dialog box then displays any objects of that category that are in the other database. You can then select the actual object to import.
If you don't want to import an entire object, you can click on the Options button. Access expands the Import Objects dialog box, as shown in Figure 15-3.
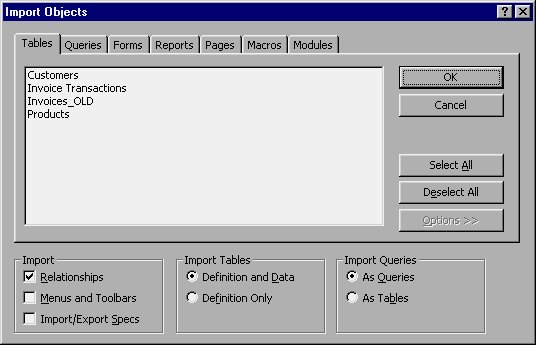
Figure 15-3 Controlling what is imported.
Using the controls in the bottom of the expanded dialog box, you can specify exactly how data should be imported to the current database.
When you are ready to proceed, click your mouse on the OK button. Access copies the specified information to your database.
Importing Delimited Text Files
There are two types of text files you can import into Access: delimited and fixed-width. These file types differ only in how they separate fields. A delimited file has some special character, such as a tab or comma, between fields. A fixed-width file uses a specific number of characters for each field, often separating fields with spaces. This section covers how you import a delimited file; importing fixed-width files is covered in the following section.
Note: If you are using a database program other than those which Access can import directly, you can probably save information from the database in some sort of text or ASCII format. If you can, you can easily import it into Access.
Access imports text files using a Wizard. When you specify a text file as your import source, the Wizard is automatically started. Figure 15-4 shows the first dialog box used by the Wizard.
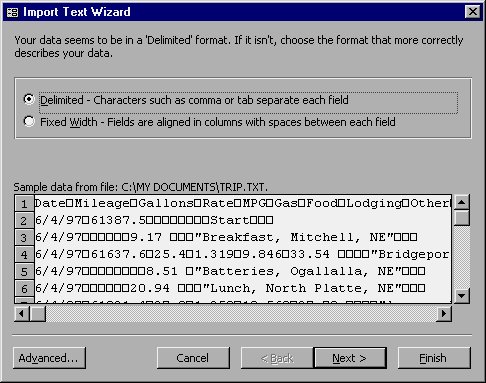
Figure 15-4 The Import Text Wizard.
Access has determined that the file contains delimited text. All you need to do is click your mouse on the Next button. The Wizard displays the next step, as shown in Figure 15-5.
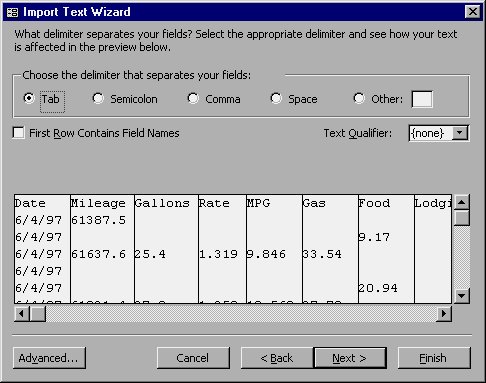
Figure 15-5 Specifying table information.
The exact composition of any delimited text file depends on the program used to create the file. Some programs use tabs to separate fields, while others use a different character or sequence of characters. This dialog box allows you to specify exactly which character is used to separate the fields in your file.
You can also indicate whether the first row of the file contains the names of the fields in the file. If this is the case, you should select the check box at the left side of the dialog box.
When you are ready to proceed, click your mouse on the Next button. The Wizard displays the dialog box shown in Figure 15-6.
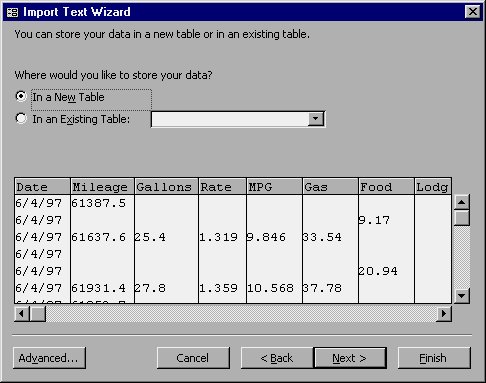
Figure 15-6 Where to store the information.
Here you are asked to specify how you want Access to treat the imported information. The default is for Access to create a new table. Quite honestly, this is the best option to choose unless you are very sure of the quality of the data you are importing. Remember, you can always merge two tables together after you are sure the import worked properly. When you are satisfied with your selection, click your mouse on the Next button. The Wizard displays the dialog box shown in Figure 15-7.
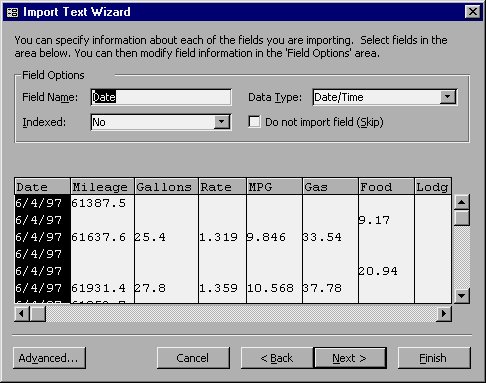
Figure 15-7 Controlling individual fields.
This dialog box allows you to control how Access imports each field from the source file. You can step through the fields and specify at the top of the dialog box how that particular field should be treated. You can even tell Access to ignore a particular field (select the check box) if you don't want to use it.
Stepping through the individual fields and indicating what data types should be used and other characteristics may seem like a time-consuming task. It does take a while, but your data will be in much better shape after the import if you take the time to provide the specifications now.
When you are satisfied with how the importing of fields is to be done, click your mouse on the Next button. The Wizard displays the next dialog box, shown in Figure 15-8.
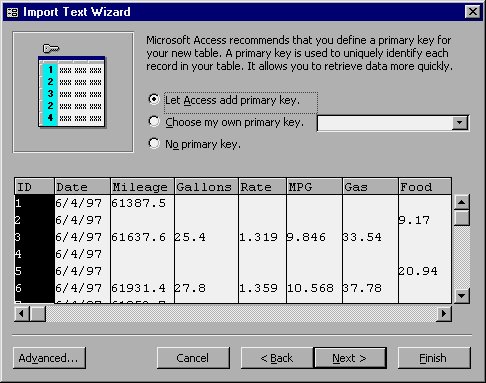
Figure 15-8 Picking a key.
Access gives you the opportunity to use keys in your data tables. You learned about keys in some detail in Chapter 13, "Understanding Data Relationships." This dialog box allows you to specify how a key should be handled for the import file. You have three choices, controlled by option buttons at the top of the dialog box:
- Let Access decide. This option causes Access to add a key field that utilizes the AutoNumber data type. This is a common way to create key fields.
- Pick a field. This option allows you to specify which field from the import table should be considered a key field.
- Ignore the key. This option means that no key field is specified for the table.
When you have made your selection, click your mouse on the Next button. The Wizard displays the final dialog box, shown in Figure 15-9.
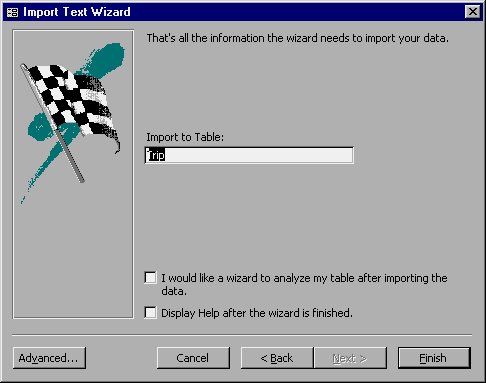
Figure 15-9 Indicating a table name to use.
The major purpose of this dialog box is to provide a way for you to specify the name to be assigned to the table created by the Wizard. Indicate a table name, and then click on Finish to complete the importing. When the import is complete, Access informs you it is done.
Note: At the bottom of the dialog box shown in Figure 15-9 is a check box that allows you to analyze your imported data table. This option, if selected, runs the table analysis feature described in Chapter 10, "Using Additional Tools."
You may have noticed that each dialog box used by the Import Text Wizard included an Advanced button at the bottom. This button, if selected, allows you to set additional parameters which Access will use when importing the textual information. When you click your mouse on the Advanced button, the Wizard displays the dialog box shown in Figure 15-10.
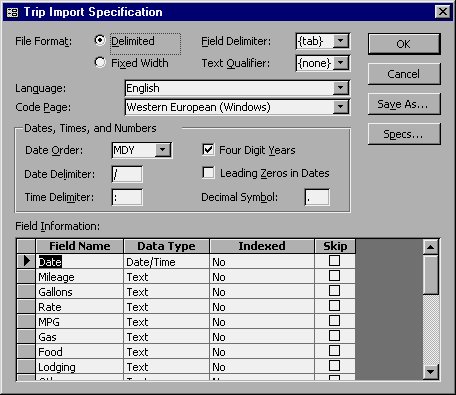
Figure 15-10 The Specifications dialog box.
You use this dialog box to set the complete specifications for importing a particular type of text file. You can see in Figure 15-10 that the dialog box contains all the specifications set by working through the previous steps in the Wizard.
The value of setting specifications for a file type is evident if you routinely import a consistent type of text file created by a different application. You can save the specifications in a file (notice the Save As button), and then recall them as a group when you need to import the next file. In most instances, you will not need to change these import options.
Importing Fixed-Width Text Files
A fixed-width text file is one that uses spaces to separate columns. These types of files are common if you have a program that produces reports destined for an older monospace printer. (Monospace means that every character has the same width as every other character.) If you are importing a fixed-width text file, the process is very similar to when you import a delimited text file. The first Import Text Wizard dialog box you see is shown in Figure 15-11.
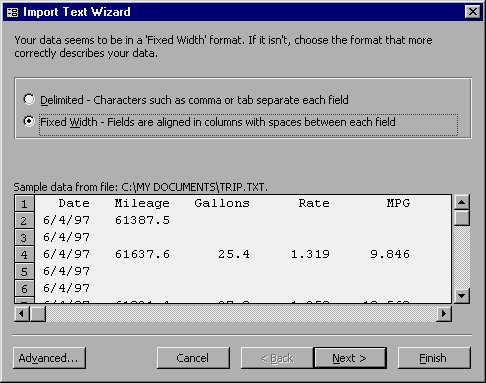
Figure 15-11 Importing a fixed-width text file.
Access has figured out that the file is fixed-width in nature, and is asking for your concurrence. All you need to do is click on the Next button. The Wizard displays the dialog box shown in Figure 15-12.
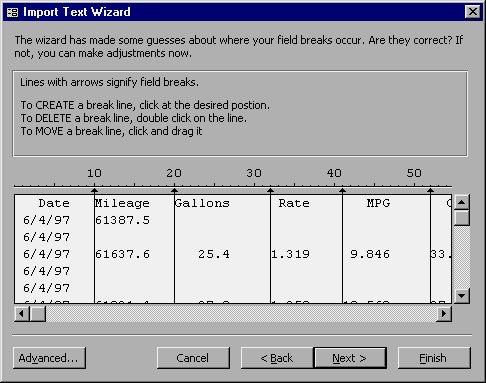
Figure 15-12 Confirming column breaks.
In this dialog box you are asked to confirm the column breaks that Access has figured out. The vertical lines in the bottom of the dialog box indicate column breaks. When the actual importing is done, Access considers each column an individual field in the resulting table. All you need to do is scroll through the table and make sure that the column breaks, as noted, are correct. You can move column marks by clicking on them with the mouse pointer and dragging them left or right. You can delete a column marker entirely by double-clicking your mouse on it.
When you are satisfied with the position of the column marks, click your mouse on the Next button. The Wizard displays a dialog box asking you to indicate where the imported information should be stored. This is the same dialog box shown in Figure 15-6. From this point on, the Wizard is exactly the same as the Import Text Wizard for a delimited text file. You can refer to the previous section to continue the importing.
Importing Excel Files
When you choose to import an Excel spreadsheet file, and you have specified a file name, Access displays the Import Spreadsheet Wizard dialog box, as shown in Figure 15-13.
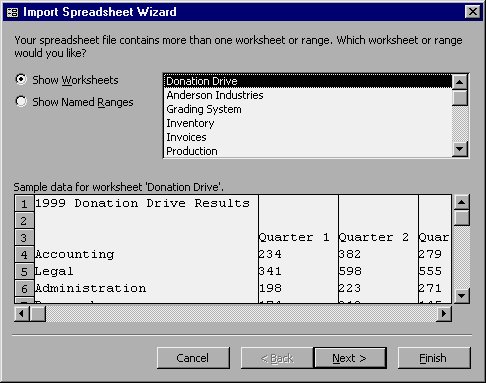
Figure 15-13 The Import Spreadsheet Wizard dialog box.
All you need to do in this dialog box is indicate which worksheet or named range of cells you want to import to Access. The dialog box lists each available worksheet or range, and you can see what they contain by clicking your mouse on them. The contents appear at the bottom of the dialog box.
When you have selected what you want to import, click your mouse on the Next button. The Wizard displays the dialog box shown in Figure 15-14.
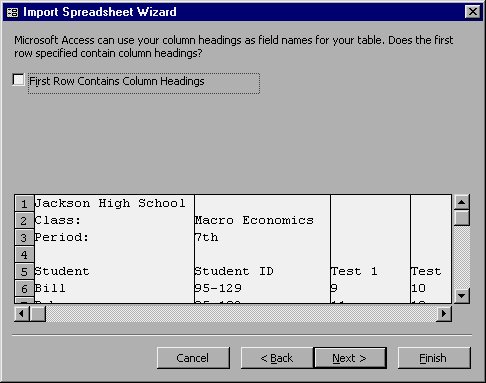
Figure 15-14 The Import Spreadsheet Wizard dialog box.
At the top of the dialog box, you can indicate whether the first row of the worksheet contains field names. Select or clear the check box, as appropriate, then click your mouse on the Next button. The Wizard displays the dialog box shown in Figure 15-15.
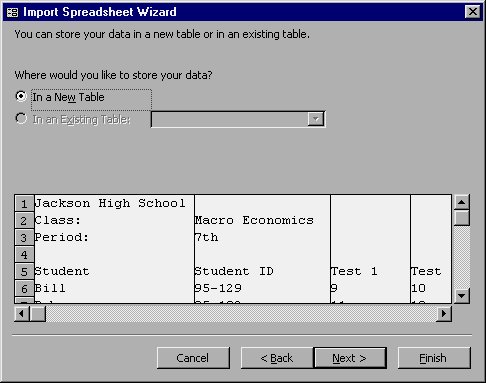
Figure 15-15 Where to store the information.
Here you can indicate whether you want Access to create a new table with the imported information. For most worksheets, this will be the only option you can choose. The exception is when the worksheet you are importing has the same number of columns as there are fields in one of your existing Access tables. You can simply click your mouse on the Next button to proceed to the next dialog box, shown in Figure 15-16.
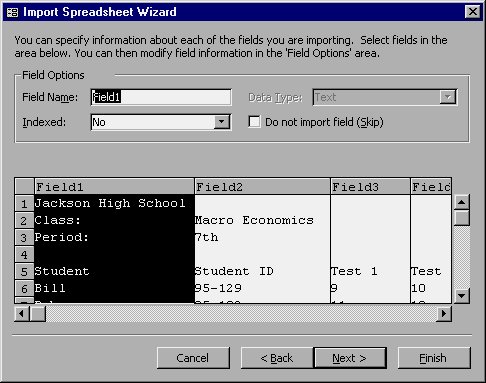
Figure 15-16 How to process fields.
This dialog box allows you to control how Access imports each column from the worksheet. You can step through the columns--which correlate to fields in Access terminology--and specify at the top of the dialog box how that particular field should be treated. Simply click on a column, then change the settings at the top of the dialog box. You can even tell Access to ignore a particular field (select the check box) if you don't want to use it.
When you are satisfied with how the importing of columns is to be done, click your mouse on the Next button. The Wizard displays the next dialog box, shown in Figure 15-17.
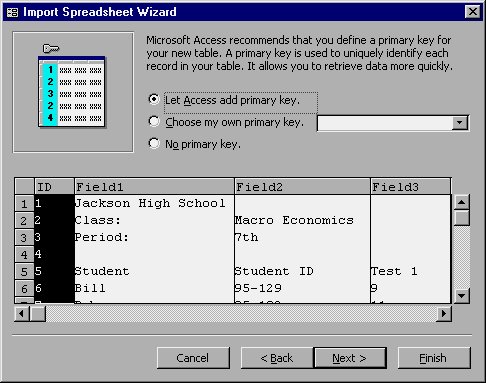
Figure 15-17 Picking a key.
Access gives you the opportunity to use keys in your data tables. You use this dialog box to specify how a key should be created for the table Access is creating. You have three choices, controlled by option buttons at the top of the dialog box:
- Let Access decide. This option causes Access to add a key field that utilizes the AutoNumber data type. This is a common way to create key fields.
- Pick a field. This option allows you to specify which column from the worksheet should be considered a key field.
- Ignore the key. This option means that no key field is specified for the table.
When you have made your selection, click your mouse on the Next button. The Wizard displays the final dialog box, shown in Figure 15-18.

Figure 15-18 Indicating a table name to use.
The major purpose of this dialog box is to provide a way for you to specify the name to be assigned to the table created by the Wizard. Indicate a table name, and then click your mouse on Finish to complete the importing. When the import is completed, Access lets you know it is finished.
Importing Lotus Files
Lotus 1-2-3 is a popular spreadsheet program that is still widely used. Because Lotus 1-2-3 is a spreadsheet program, Access lets you import its files in much the same fashion as when you import Excel files.
When you start to import a Lotus 1-2-3 file, the import Wizard asks you to specify what you want to import from the file. In the various dialog boxes used by the Wizard, you specify the information to import, indicate how it should be converted, instruct Access what to do about a key for the table, and then provide a table name.
When you are done importing, you will be able to use the Lotus 1-2-3 data in Access, the same as you would any other database table.
Importing Paradox and dBASE Files
Importing these types of files is perhaps the easiest importing you can do. This is because after you select a file name and click on the Import button, Access imports the file right away--there are no other dialog boxes to work through. Access stores the file in a table with the same name as the file you are importing. Access then returns you to the file selection dialog box. You can select another file, or you can click on Close to return to the Database window.
Learn Access Now! Chapter 14 Next Section in Chapter 15 Chapter 16