Learn Access Now! Chapter 12 Previous Section in Chapter 13 Next Section in Chapter 13 Chapter 14
Chapter 13: Understanding Data Relationships
(This is section 2 of 3 in this chapter)
Establishing Relationships
Note: This section uses the Customer database you have used in several chapters of this book. If you do not have that database available, you may want to use the Customer 4.mdb database located on the CD-ROM. You should copy the file to a directory on your hard drive and rename it Customer.mdb.
You now know what database relationships are and how they are put together. It is time to put this information to good use by designing your own relational database. You will do this by expanding the Customer.mdb database you developed earlier in the book. You will recall that this database contains a single table--Business Customers.
If you take a look at that table, you will notice there is some redundant data in it. The Salesperson field contains the name of an in-house sales rep that is repeated over and over again in the records. To remove this redundancy, you can put the salespeople in their own table and simply use a pointer to a Sales ID field. To accomplish this effectively, you must perform these steps:
- Derive the unique names of existing sales people
- Create the table for the sales people
- Modify the Business Customers table
- Establish links between the two tables
- Check your links
Note: If going through this optimization process seems like a lot of work to you, you might try using the table analysis tool discussed in Chapter 10, "Using Additional Tools."
Pulling Out Unique Names
To pull out the unique names in the Salesperson field of the current Business Customers table, you can use a query. (You learned how to put queries together in Chapter 6, "Using Queries to Examine Your Data.") If you use an action query, you can create a new table with the results; that is what you will accomplish in this step.
First, you need to create a base table which can receive the results of your query. You will call this table Sales Staff. The table will serve as the basis for your work in the following section. Create this table now; it should contain the following two fields:
- Sales ID. This field has an AutoNumber data type. Use this field as the primary key.
- Name. This field has a Text data type, with a length of 50.
That's it. When you save the table, do so under the name Sales Staff. The table should appear in the Database window.
Note: If you need a refresher on how to create tables from scratch, you may want to refer back to Chapter 4, "Creating Another Database."
You are now ready to put together your query. To create your query, perform these steps:
- Click your mouse on the Queries button in the Database window.
- Double-click your mouse on the Create Query in Design View option. Access will display the query Design window overlaid by the Show Table window.
- In the Show Table window, double-click your mouse on the Business Customers table name. Access displays a field list for the table in the query Design window.
- Close the Show Table window by clicking your mouse on the Close button.
- Choose the Append Query option from the Query menu. Access displays the Append dialog box, as shown in Figure 13-1.
- Use the Table Name drop-down list to select the name of the table you just created--Sales Staff. Make sure the Current Database option is selected, and then click your mouse on OK.
- In the field list for Business Customers, double-click your mouse on the Salesperson field. Access will display the field in the QBE grid at the bottom of the dialog box.
- Specify that the field should be sorted in ascending order.
- Use the pull-down list in the Append To cell of the QBE grid to select the Name field. This is the field in the Sales Staff table to which you want the Salesperson name appended.
- Double-click your mouse in any part of the gray area to the left or right of the Business Customers field list. Access will display the Query Properties dialog box, as shown in Figure 13-2.
- Select the Unique Values property; change it to Yes. This ensures that the query returns only unique values, meaning that you will only get one occurrence of each salesperson.
- Close the Properties dialog box by clicking your mouse on the Close icon in the upper-right corner.
- Close the query Design window by clicking your mouse on the Close icon in the upper-right corner. Access asks you if you want to save the query.
- Click your mouse on the Yes button. Access displays the Save As dialog box, as shown in Figure 13-3.
- Enter the name Pull Sales People and click your mouse on the OK button. Access saves the query.
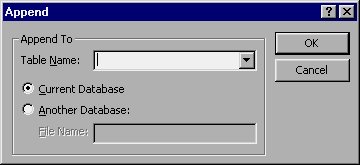
Figure 13-1 The Append dialog box.

Figure 13-2 Properties dialog box for your query.
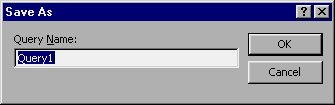
Figure 13-2 The Save As dialog box.
That's it. In a few short steps, you have created a query that will pull the desired information from one table and put it in another. You can run the query by selecting the query name in the Database window, and then clicking your mouse on the Open button. Shortly, Access will display a dialog box reminding you that your query will modify data in a table and asking you if you are sure you want to run it. Click your mouse on the Yes button, and Access runs the query.
Note: If you get an error message, it means that you didn't create the Sales Staff base table, as discussed earlier in this section.
When the query is completed successfully, Access displays a dialog box informing you that it is about to append ten rows. This refers to the fact that ten salespeople names were pulled from the Business Customers table, and are about to be appended to the Sales Staff table. Click your mouse on the Yes button and Access completes the query, returning you to the Database window.
You can check how you did by opening the Sales Staff table. It should look like what you see in Figure 13-4.
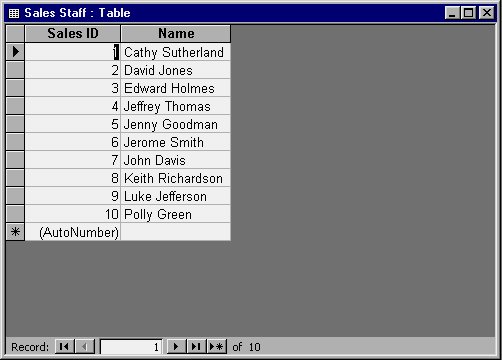
Figure 13-4 The Sales Staff table with the appended records.
Notice that the table lists each salesperson in alphabetical order. As you can see, Access has assigned each salesperson a unique Sales ID. You are now ready to really create the Sales Staff table.
Note: The query you created (Pull Sales People) has served its purpose. You can now delete the query, if you desire. There is no reason to save it.
Creating the Sales Staff Table
You now have a base table you can use for your sales people. However, the table is by no means complete. You still need to add fields for other record keeping and calculations. Take another look at Figure 13-4. Notice that there are only two fields identified for the table (that's all you created). Modify the table so it has the following additional fields:
- Last Name
- First Name
- Office
- Commission Rate
Again, these are just possible fields. The Office field lets you specify the office number in which the salesperson is located. The properties of the new fields are shown in Table 13-1.
| Field | Properties | |
|---|---|---|
| Last Name | Text data type, length of 25, field is required | |
| First Name | Text data type, length of 25, field is required | |
| Office | Text data type, length of 10 | |
| Commission Rate | Number data type, Format is Percent |
Table 13-1 Properties for the new table fields.
When you are done, switch back to Datasheet view. Access will ask you if you want to save the table. Answer Yes. Access will then display the dialog box shown in Figure 13-5.

Figure 13-5 A warning from Access.
Access displays this message because you have added some fields which are required (Last Name and First Name). Whether a field is required or not is part of the validation rules for a table. Click your mouse on the No button. Access will change the table structure and display the Datasheet view, as shown in Figure 13-6.
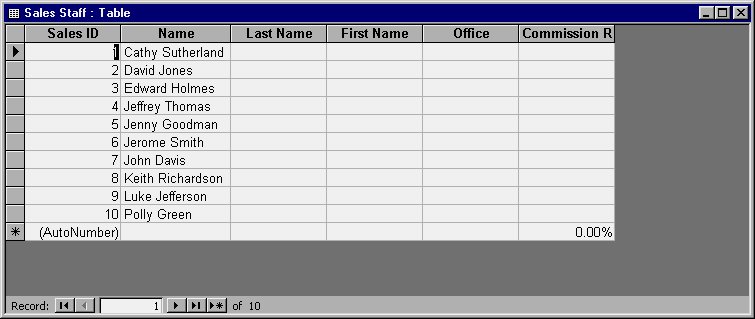
Figure 13-6 The Datasheet for the updated table.
At this point you need to manually split up the names of the salespeople. Since there are only ten records, this will only take a minute or two. When you are done, switch back to Design view and delete the Name field. This field is no longer necessary since you have updated the table with the other two fields (Last Name and First Name). When you are done deleting the field, switch back to the Datasheet. Your final table should look like what is shown in Figure 13-7.
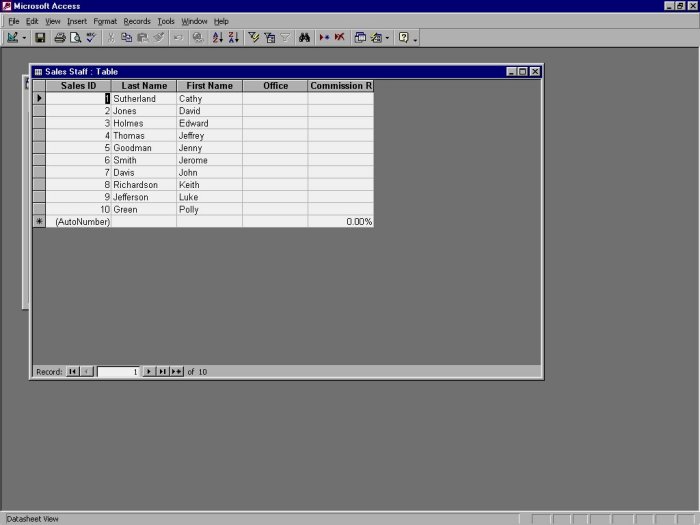
Figure 13-7 The final Sales Staff table.
At this point, you can add information to the other fields, if desired. For this example, there is no need to do so right now. As such, you are ready to modify the Business Customers table. Close the Sales Staff table before moving on to the next step.
Modifying the Business Customers Table
Because you have placed the Salesperson information into its own table, your next step is to modify the design of the Business Customers table. The modification will not be as extensive as what was done with the Sales Staff table. To modify the Business Customers table, perform these tasks:
You accomplish both of these tasks from the Design window. From the Database window, click your mouse on the Business Customers table name and then click on the Design button. Access will display the Design window, containing the layout for the Business Customers table. Change the name of the Salesperson field to something like Old Salesperson.
Next, select the row that contains the Comments field, and then select the Rows option from the Insert menu. Access adds a new row right above the Comments field, as shown in Figure 13-8.
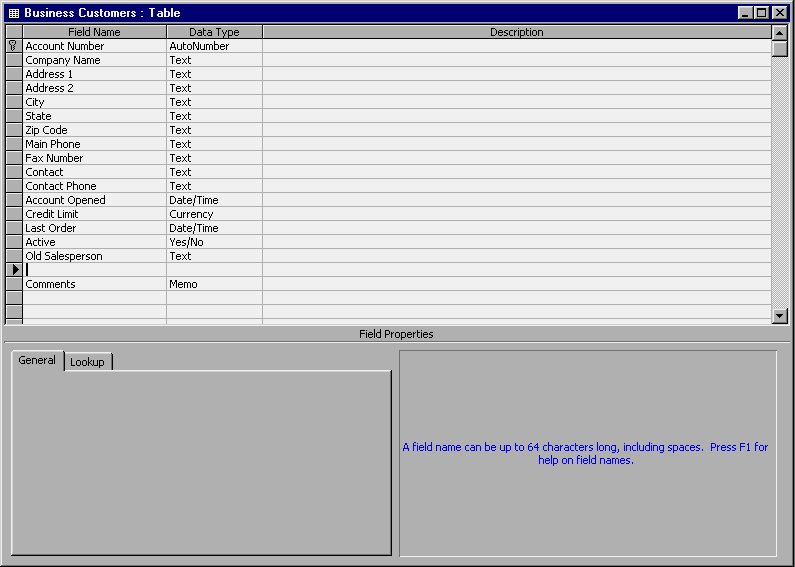
Figure 13-8 After inserting a row.
Enter Salesperson as the field name. In the Data Type column, make this field a Number. It is then very important that you set the Field Size property to Long Integer. If you omit this change, you cannot create a link between this field and the Sales ID field in the Sales Staff table (as discussed in the next section), because both fields in both tables must be of the same data type.
You are now done modifying the Business Customers table. Close the table by clicking your mouse on the Close icon in the upper-right corner of the Design window, saving your changes as you do so.
Establishing Links
As you determine how to place the links between the two tables, it is important to remember the type of relationship that exists between the two. For each record in the Business Customers table, there is one corresponding record in the Sales Staff table. This is natural; our company assigns only one salesperson to each customer. Looking at it from the perspective of the Sales Staff table, however, there can be multiple records from the Business Customers table that correspond to each record in Sales Staff. Again, this is natural. There can be multiple accounts assigned to each salesperson. Understanding how the records relate, it is easy to see that this is a one-to-many relationship.
In a one-to-many relationship, the linking column is contained in the "one" table. Thus, you use the key column for the Sales Staff table to link together the two tables. Access places values from this key in the Salesperson field of the Business Customers table. To the Business Customers table, this becomes a foreign key.
To establish links in Access, you begin at the Database window. Make sure you have the Tables button selected; you should see your two tables displayed in the Database window. Now choose Relationships from the Tools menu. Your screen should appear similar to Figure 13-9.
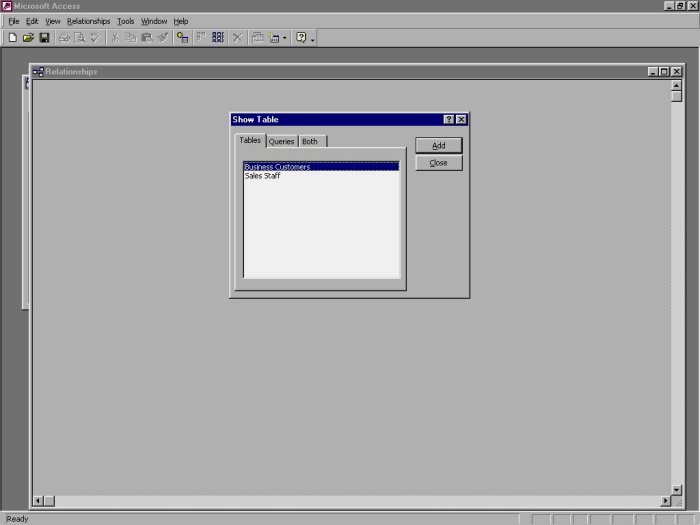
Figure 13-9 After opening the Relationships window.
Notice that Access lists both of the tables in your database in the Show Table window. You use this window to select the tables or queries between which you want to establish relationships. All you need to do is select each table, in turn, and then click your mouse on the Add button. Access will display field lists for each table in the Relationships window. When you have added both tables, click your mouse on the Close button. The Relationships window will now appear as shown in Figure 13-10.
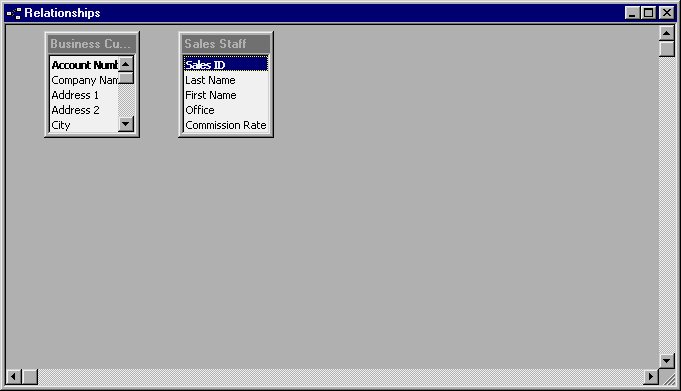
Figure 13-10 The Relationships window.
To establish a relationship between the two tables, drag the linked field from one table to the other. Remember that the relationship between the two tables is one-to-many (as discussed earlier in this chapter). In this case, you should start with the "one" side of the relationship, meaning the field in the Sales Staff table. Use the mouse to point to the Sales ID field, hold down the mouse button, and drag it over the top of the Salesperson field in the Business Customers field list. When you release the button, Access will display the Edit Relationships dialog box shown in Figure 13-11.
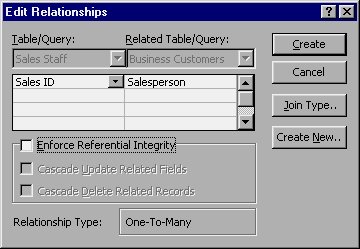
Figure 13-11 The Edit Relationships dialog box.
Notice that the left side of the grid (in the Table/Query column) shows the Sales Staff table; this is where you pulled the Sales ID field from. The other side (in the Related Table/Query column) shows the Salesperson field in the Business Customers table; this is where you dropped the field. This is the relationship you want to create.
The only other option you can choose here is to select the Enforce Referential Integrity check box. When you select this option, Access will automatically make sure that anything you enter in the Salesperson field of the Business Customers table is a valid record in the Sales ID field of the Sales Staff table. This is a powerful feature which helps to maintain the validity of your data. You should select this option.
When you select the Enforce Referential Integrity check box, notice that the options at the bottom of the dialog box become available. That is because these options indicate how Access is to apply the integrity rules.
- The Cascade Update Related Fields check box only has relevance if the field on the "one" side of the relationship can be edited. This is not the case with the Sales ID field; it is an AutoNumber data type, which cannot be edited. If the Sales ID field were a data type which you could edit, selecting this box would cause Access to automatically update any related records in the "many" tables whenever you made changes to the Sales ID field. Since this feature has no relevance to your table, leave this check box unchecked.
- The Cascade Delete Related Records check box indicates if you want records in Business Customers deleted when you delete the Sales ID record in Sales Staff table. This check box provides you with a quick way to make sure Access deletes any records belonging to a salesperson when you delete the salesperson's record. In most organizations, you don't want to do that, however. Instead, you want to reassign those accounts to a different salesperson. Leave this check box unchecked.
Now, to establish the relationship you have specified, click your mouse on the Create button. Access closes the Edit Relationship dialog box and again displays the Relationship window. Figure 13-12 shows this window with the updated link.

Figure 13-12 The updated link.
You can now close the Relationship window by clicking your mouse on the Close icon at the upper-right corner of the window. Access will ask you if you want to save your change to the table layout. Click your mouse on the Yes button, and Access will save your work, returning you to the Database window. Your two tables are now related.
Checking Your Link
There are two things you still need to do with the Business Customers table. One is to check your link to make sure it is in place. The other is to get rid of the Old Salesperson field. Open the Datasheet for the Business Customers table. If you display the Salesperson column, you will notice it is empty (rightly so; you haven't put any data in it yet). Try entering a value that is out of the range of valid Sales IDs. You know the valid IDs are in the range of 1 through 10, so try putting in a 62 or some such number. When you try to leave the field, you should get an error message, as shown in Figure 13-13.

Figure 13-13 Access doesn't permit invalid reference numbers.
Access won't let you put in an invalid value. Click your mouse on the OK button to clear the message, and you can try again.
There is one thing you can do to make putting in the IDs for the sales staff easier. Remember that when you exported the names of the sales staff, you did it in alphabetical order. Thus, Sales ID 1 is at the first of the alphabet, and Sales ID 10 is at the last. Select the Old Salesperson field and click your mouse on the Sort Ascending tool. This puts the records in order, by the salesperson's name. In the Salesperson column, you can now enter 1 for the first salesperson, 2 for the second, and so on. When you are through, you can switch to Design view and delete the Old Salesperson column. Your database now fully utilizes relational tables.
Learn Access Now! Chapter 12 Previous Section in Chapter 13 Next Section in Chapter 13 Chapter 14