Learn Access Now! Chapter 19 Previous Section in Chapter 20 Next Section in Chapter 20 Chapter 21
Chapter 20: Using Visual Basic for Applications
(This is section 3 of 6 in this chapter)
Creating a VBA Module
Now that you know how to put together a program, you are ready to give it a try. To create a VBA procedure, you follow many of the same steps you follow when you created macros. The general steps in VBA programming are as follows:
- Identify the task you want to accomplish.
- Plan the steps needed to accomplish that task.
- Create the programming code necessary to implement the steps.
- Test the program.
- Refine the program.
- Repeat steps 4 and 5 until the program works correctly.
Does this sound familiar? It should; with only minor variations it is the same process you learned in Chapter 18, "Creating and Using Macros." This is because the principles of programming apply whether you are working with the macro language or with VBA.
You create VBA programming code by using the VBA Editor, which is described in the following section.
What is the VBA Editor?
You create VBA programs using the VBA Editor. To start the VBA Editor, first click your mouse on the Modules button in the Database window. Then, click your mouse on the New button. Access, in turn, displays the VBA Editor, as shown in Figure 20-1.
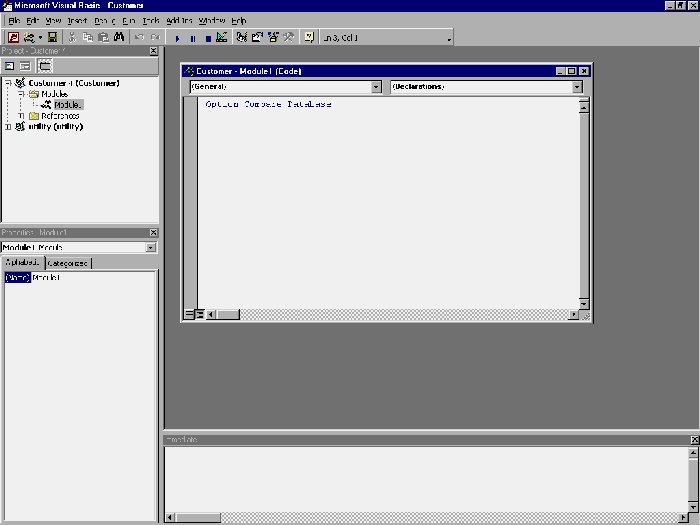
Figure 20-1 The VBA Editor.
Notice that there are several different parts to the VBA Editor. In the upper left corner is what the editor refers to as the Project window. This is where you can see the different elements of your project and any modules that have been defined in the workbook. Just below the Project window is the Properties window. Here you can specify different attributes of whatever you have selected in the Project window. For most simple development needs, you will never do much with the Properties window. To the right of the Properties window, and at the very bottom of the screen, is the Immediate window. This is where you can either test parts of your procedures during development or you can find the immediate results of various commands. The Immediate window comes in very handy during testing and debugging, when they are necessary.
Note: If a window is not displayed within the VBA Editor, you can display it by choosing one of the options from the View menu. For instance, if you want to display the Project window, choose Project Explorer from the View menu.
The Module window, which is the largest window on the screen, is where you do your programming. At the top of the Module window are two drop-down lists. The one on the left is called the Object box. The one on the right is the Procedure box. You use the Object box to select which object you want to work with. When you first create a module, the object is set to the word General, meaning you are working on a general module, not on one associated with a particular object in a form or report.
The Procedure box is where you indicate the name of the procedure on which you want to work. If you choose or specify a different procedure in this box, the information Access shows in the Module window changes to reflect the VBA statements you have assigned to that procedure.
The top level of a module is the Declarations section; It begins with the procedure name you indicate in the Procedure box when you first create a module. Take a look at the Module window (Figure 20-1). It contains the programming code already defined for the declarations section. In this instance, there is only one line of code defined--a statement that indicates the database's default sort order.
To enter programming statements into a procedure, you type them in the Module window. As you enter information, Access checks to make sure it can understand what you type. In other words, Access checks the syntax of what you enter. You use the correct syntax when you follow the VBA rules of grammar.
You can cut, copy, and paste sections of code using standard Windows mouse or keyboard techniques. You can perform these operations either in the same procedure or between different procedures.
Creating a New Procedure
Note: This chapter uses a version of the Customers.mdb database you developed in earlier chapters of the book. You should copy the Customer 8.mdb database from the companion CD-ROM to a directory on your hard drive and rename it Customer.mdb. You should do this rather than using any older versions of Customers.mdb, since the CD-ROM version has a new form in it that you will need.
Assume for a moment that you want to create a procedure that will step through the records in the Business Customers table, which you developed earlier in this book. The procedure will check the ZIP Code of every record. If the ZIP Code equals a specific value, the procedure will change the record's salesperson.
Your first step is to create a new procedure in the Module window. To do this, you must first decide if your procedure will be a subroutine or a function. Your choice will depend on the task you want the procedure to perform. Remember, if you want your procedure to return a value, you need to make it a function. You also need to determine a name for your procedure. Unlike the names you use for fields, tables, and other database objects, this procedure name cannot contain spaces. In this case, let's say you decide to use the name ChangeSalesByZip, which is quite descriptive. If you want to create a function by this name, you simply enter the following on a blank line in the Module window:
Function ChangeSalesByZip()
After you press the Enter key, Access changes the way the Module window looks, as shown in Figure 20-2.
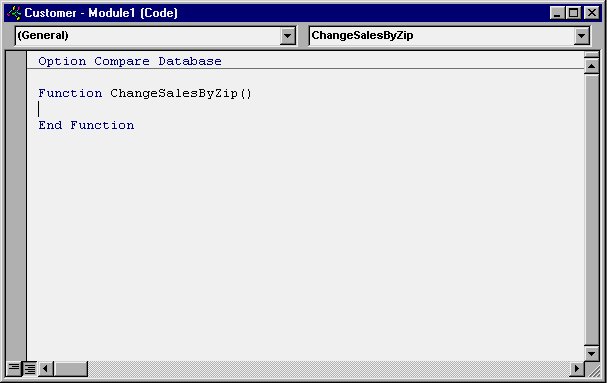
Figure 20-2 The Module window for the new procedure.
Notice that VBA provides two program lines. These statements define your function's starting point and ending point. You must place the programming lines that make up your function between these points.
Notice, also, that Access lists your new function in the Procedures box at the top of the Module window. If you had many procedures in your module, you could display other procedures by clicking your mouse on the pull-down arrow at the right of the Procedures box and selecting another procedure name.
Specifying Parameters
Take a look at the parentheses after the function name (on the first line of the procedure). Inside these parenthesis, you specify arguments (parameters) for your function. Position the cursor between the parentheses, and change the line so it looks like this:
Function ChangeSalesByZip(ZipWanted As String, NewSales As Long)
This statement tells VBA that your function requires two arguments: ZipWanted and NewSales. The first parameter is a string, and the second is a long integer. Your function will use these arguments to determine which records to change and what to change them to.
There is one other thing you need to do to this function's first line. You already know that you use functions when you want to return information to whoever called it. In this case, you want to return the number of records the function changes. You need to specify, on this first line, what type of value your function will return. Add As Long to the end of the line, so it looks like this:
Function ChangeSalesByZip(ZipWanted As String, NewSales As Long) As Long
The As Long tells VBA that this function returns a long integer to the calling routine. With these declarations out of the way, you are ready to enter the body of your routine in between the first and last lines on your screen.
Specifying Variables
Your next step is to specify the variables Access will use in your routine. You already know you will be using the variables specified as parameters for the function, but there are other variables necessary, as well. For instance, you will need to use variables for counters, table names, and for objects within the database. Add the following lines to your function:
Dim TableName As String
Dim ChangeCount As Long
TableName = "Business Customers"
ChangeCount = 0
The first two lines declare two variables. The first variable (Tablename) will store the table name; the second variable (ChangeCount) will count the number of changed records. The third and fourth lines set the values for the variables.
Next, add the following lines to your function:
Dim CustDB As Database, CustTable As Recordset
Set CustDB = DBEngine.Workspaces(0).Databases(0)
Set CustTable = CustDB.OpenRecordset(TableName, dbOpenTable)
These lines set up the object variables necessary to access your data. The first line declares two variables, one for the database and the other for the records in the database.
The second line defines the database object. This Set statement uses an object address composed of the highest-level object (the Access database engine), the Workspaces collection, and the Databases collection. This verbiage will always return a reference to the currently open database.
The third line builds on the object you defined in the second line. Using the CustDB object, the OpenRecordset method opens the table needed. At the end of these two lines, you can use CustDB to refer to the Customer.mdb database, and use CustTable to refer to the Business Customers table within that database.
You have now finished the preliminaries of your function--the necessary part that sets up your data. Your Module window should look like what you see in Figure 20-3, and you are now ready to develop the main body of your function.
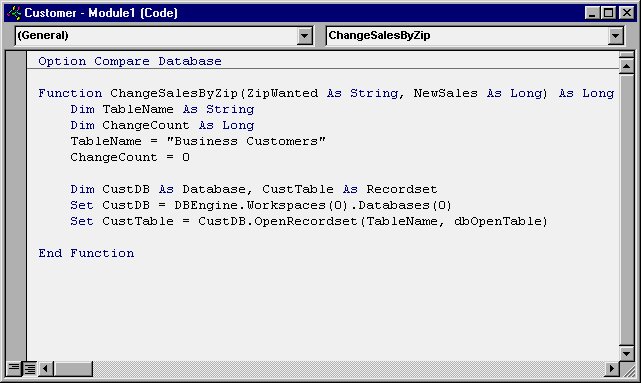
Figure 20-3 Part way through your function.
Stepping Through the Records
The next part of the function will step through the records in your database to determine if a change is necessary. If a change is necessary, the function makes the change and saves the update. Enter the following into your function:
Do Until CustTable.EOF
If CustTable![Zip Code] = ZipWanted Then
CustTable.Edit
CustTable!SalesPerson = NewSales
CustTable.Update
ChangeCount = ChangeCount + 1
End If
CustTable.MoveNext
Loop
This code section uses a Do Loop structure. On the first line of the loop, you define a condition you want VBA to check. VBA repeats each of the statements between the Do Until and Loop statements until that condition is met. In this case, you want the function to check each record in your table, one record at a time. In other words, you want your function to begin with the first record and to end with the last. The last record, therefore, becomes your Do Loop's ending condition.
Your function can use the EOF (end of file) condition to determine when it has used the last record. In this case, the code will repeat the statements until the EOF condition returns true.
The If statement checks to see if a record needs to be changed. On the If line, you define a condition you want to test: in this case, whether the ZIP Code of the table record is equal to the ZIP Code you want to change. If it is, VBA executes the lines between that point and the End If statement. If the ZIP Codes are not equal, VBA skips those lines.
The statements between the If and End If statements update and save the record. First, the Edit method lets the function edit the data in the table. The next line changes the Salesperson field. Then, the Update method writes the changed information back to the table. The line after the Update method incrementally counts the number of records changed.
VBA always executes the next line (CustTable.MoveNext), whether there was a change in the record or not. (Access executes this line because it is physically outside of the If/End If structure.) Using the MoveNext method, the code moves the table pointer to the next record in the table.
When these lines of code complete, the function will have checked all of the records in the table. You are now ready to finish up your function.
Wrapping It Up
You are now at the end of your function, and you are ready to finish it up. To do so, enter the following lines:
CustTable.Close
CustDB.Close
ChangeSalesByZip = ChangeCount
The first two lines close the table and the database, respectively. The third line assigns the count of changed records to the function name. This line causes the function to return a value to wherever it was called from; without the statement, your function would always return a zero. The entire function is shown in Figure 20-4.
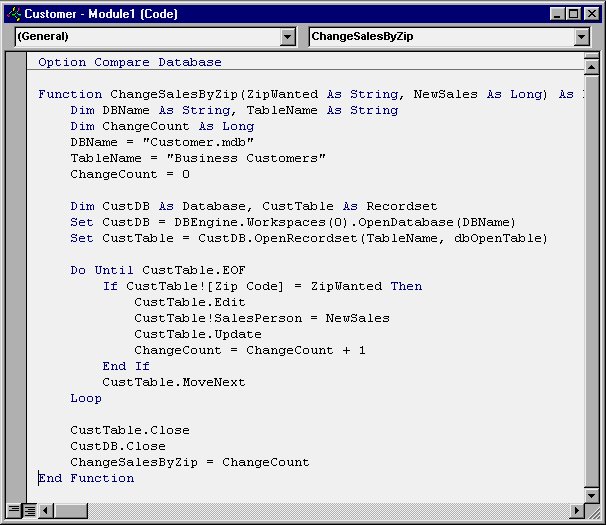
Figure 20-4 The finished function.
Saving Your Module
After you have finished your first procedure, you can create other procedures in this same module, if you desire. Otherwise, your next step is to save your module and close it. You save the module by clicking your mouse on the Save tool on the toolbar, or by choosing Save from the File menu. Access then asks you for the name you want to use for your module. Enter a name, such as MyModule, and then press ENTER or click your mouse on OK. Access will save the module as a part of the database.
Now you can close your module by clicking your mouse on the Close icon (the X) in the upper-right corner of the VBA Editor program window. (You can also choose Close and Return to Microsoft Access from the File menu, if desired.) Access closes the VBA Editor and again displays the Database window, as shown in Figure 20-5.
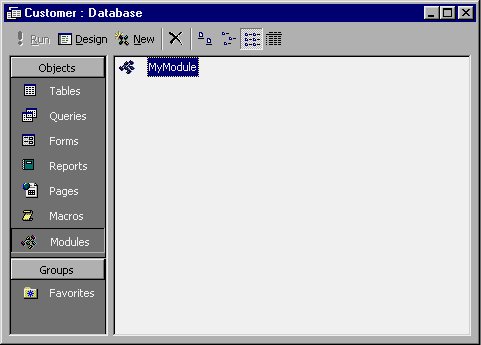
Figure 20-5 The updated Database window.
Learn Access Now! Chapter 19 Previous Section in Chapter 20 Next Section in Chapter 20 Chapter 21