Learn Access Now! Chapter 13 Previous Section in Chapter 14 Next Section in Chapter 14 Chapter 15
Chapter 14: Creating Complex Reports
(This is section 3 of 4 in this chapter)
Designing Your Report
Assume you want to create a report that lists all the accounts in the Business Customers table you developed earlier in the book. To do this, you use the report Design window in much the same way as you would use a paint or drawing program, and in a very similar manner to how you created forms in Chapter 9, "Creating Custom Forms." You place an object, refine how it looks, and then place another object. You repeat this process until you achieve the desired effect.
Setting Up the Detail Section
To create your report, you first need to define the report's body. This may sound strange to some, since there are other parts of the report that Access prints before the body. The reason for this is quite simple, however. The position of information in the body of the report will dictate the position of information in headers. With that in mind, you need to first decide what you want Access to print in the report.
For this report, you will use the following fields:
- Company Name
- Address 1
- Address 2
- City
- State
- Zip Code
- Main Phone
- Account Opened
You could have included other fields , but this report is for general information. The other fields are too specific for a general audience. Further, you may want to group the report by state. If you group your customer data by state, your sales representatives can quickly identify their regions' customers without having to sort or query the state.
With this information in mind, you can start to place the fields on your report. You do this by using the mouse to select and drag a field from the Business Customers field list into the detail section of your report. For instance, click your mouse on the Company Name field, and then drag it onto the detail section of the report. When you release the mouse button, Access places two objects on the form: a Label and a Text Box. The Label contains the Caption property for the field, and the Text Box contains the name of the field itself, as shown in Figure 14-2.
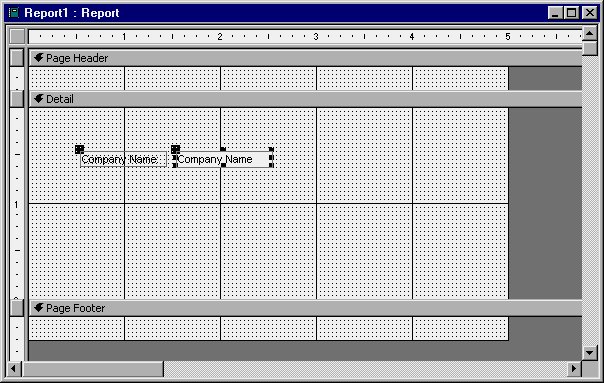
Figure 14-2 Placing a field on the report.
When you place the field, Access automatically selects both objects (the Label and the Text Box). Make sure that only the Label object is selected (when it is selected it will have the handles around it), and then press the DEL key. This gets rid of the Label object. This is a good idea since you don't want labels printed with every single record in the table. Instead, you will later want them to appear as column headers in the page header section of the report.
After you delete the Label object, you should accomplish these tasks:
- Position the Text Box object so it is near the top left corner of the detail section.
- Make the Text Box object wide enough that it can print the widest company name in your table.
- If your printer will support them and you want to use them, change colors or other attributes of the Text Box.
That's basically all there is to placing fields in your report. You place them, format them, and go on to the next one.
Note: The placement and sizing of objects within your report is important. If an object such as a text box or a label is not the right size, the text within the object will not print fully. Make sure your objects are an appropriate size for what you want them to print.
You are now ready to place the address on the report line. You could place individual fields for both Address 1 and Address 2, just as you did when you placed the company name, but that would take quite a bit of space on the line. Instead, you can use an expression to combine the two fields together and print them in a single text box. To create an expression, select the Text Box tool from the toolbox. Then place the Text Box in the detail section of your report. Notice that placing the Text Box automatically places a Label object, the same as when you drag-and-drop field names. Delete the Label and select the Text Box. Then, display the Properties dialog box for the Text Box, as shown in Figure 14-3.
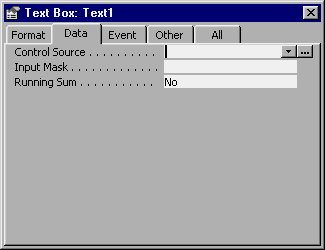
Figure 14-3 Properties dialog box for a Text Box object.
To combine the two address fields, you must change the Control Source property. This is the property that controls what Access displays in the Text Box. Normally, you would set this to the name of a particular field in your table. In this instance, you are going to use an expression. Select the property and enter the following:
=[Address 1] & IIf(IsNull([Address 2]),"",", " & [Address 2])
This expression may look complicated, but it is not really. Access lets you create expressions based on field names (enclosed here within brackets) and functions. You will learn more about functions in later chapters, when you learn more about macros and Visual Basic for Applications. This particular expression simply tells Access that you want to display the contents of the Address 1 field and (if Address 2 is not empty) a comma, a space, and the contents of the Address 2 field. At this point, you can change the formatting of the Text Box in the same manner as you did earlier for the company name.
You can apply the same sort of idea to the display of the next part of the address: the city and state. Perform the steps you just finished to place the Text Box on the screen. Next, enter the following expression in the Control Source property:
=[City] & ", " & [State]
This expression is much shorter; it combines the contents of both fields. This is perfectly acceptable in this instance since you can feel reasonably sure that there will be a state listed for each of your customers.
Place the text boxes for the remaining fields (Zip Code, Main Phone, and Account Opened). If you desire, you can set the Format property of the Account Opened field so it displays a fuller date on the report.
Note: If you need a refresher about the Format property, refer to Chapter 9, "Creating Custom Forms."
When you are through placing fields and adjusting them, you should have six of them on the screen. Adjust the details section grid so it does not take so much vertical room. Remember that Access uses the size of the grid area to determine how much room to leave for each record in the body of your report. As you placed the objects in the detail section, you should also have adjusted the width of the report to fit your needs. Figure 14-4 shows what your report Design window should look like.
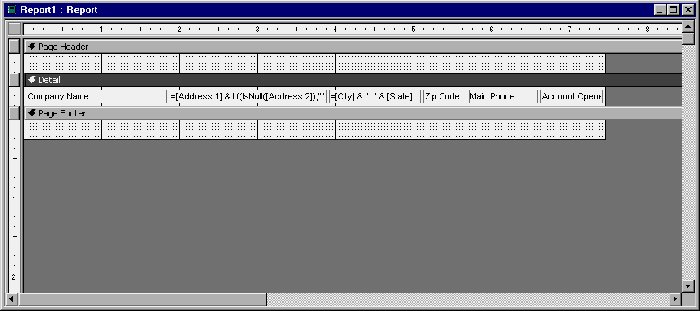
Figure 14-4 The detail section of the report is complete.
Grouping Your Data
To finish out the body of your report, you still need to group your data by state. To group your data, choose Sorting and Grouping from the View menu, or click your mouse on the Sorting and Grouping tool on the toolbar. When you do, Access displays the Sorting and Grouping dialog box shown in Figure 14-5.
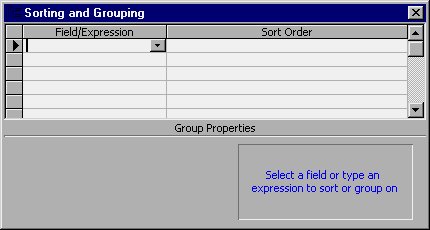
Figure 14-5 The Sorting and Grouping dialog box.
Next, specify the field you want to use to control the grouping. Click your mouse on the pull-down arrow at the right side of the cell and select the State field from the drop-down list. When you do, Access displays a set of group properties at the bottom of the dialog box. These properties control how Access handles the group. If you accept the default properties, Access only sorts the report. You can, however, also instruct Access to include a group header or footer. To see how these work, change the Group Footer property to Yes and then close the Sorting and Grouping dialog box by clicking your mouse on the Close icon in the upper-right corner of the dialog box. You will notice there is a new section on the report, as shown in Figure 14-6.
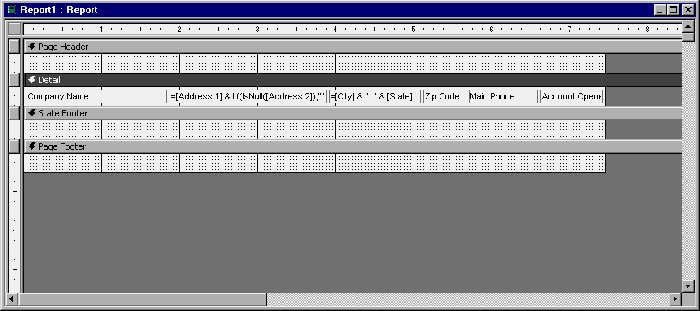
Figure 14-6 After a group footer section has been added.
The group footer section (or the group header section, for that matter) is just like any other header or footer. You use it to tell Access what you want printed at the end of every group. For instance, you could print a count of the number of customers in each state. To do this, add a Text Box at the right side of the group footer section. In the Control Source property for the Text Box, you need to enter the following expression:
=IIf(Count([State])=1,"There is 1 customer in this state","There are " & Count([State]) & " customers in this state")
This may seem like a long expression, but it displays proper grammar (There is versus There are), depending on the number of customers in a state. With the entry of this expression, you are done with the body of your report.
Setting Up the Page Header
You already know that a page header contains information you want Access to print at the top of every page of your report. With this in mind, you should include information in the page header such as recurring headings, page numbers, and column headings. For your customer list, a page number and column headings will do fine. You can place most of these items using the Label object.
Click your mouse on the Label tool (the one with the capital A in it). Next, start the label box directly above the Company Name field, near the lower left corner of the page header section. Make the label box wide enough to hold the column heading for the Company Name field; you can always resize the box later. At this point, the Design window will look like what you see in Figure 14-7.
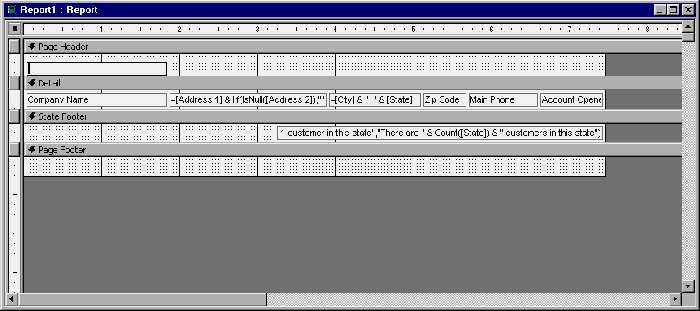
Figure 14-7 After placing a Label object.
Access is waiting for you to type the text that should appear in the label. Type the words Company Name and then press ENTER. The words should appear at the left side of the box and handles will appear around the box. You can now format the label to your liking. You may want to set each of these:
- Click your mouse on the Bold tool so the text is printed bold.
- Change the font or point size of the text.
- Change the color or shading of the text (if your printer supports those features and you want to use them).
After you are through defining this label object, you can use the same technique to set the other label objects in the page header section. Place labels for each of the following columns:
- Address
- City & State
- Zip Code
- Phone Number
- Customer Since
Don't forget to position the label boxes so they appear directly above the actual fields in the detail section. Figure 14-8 shows what your Design window should look like when you are done.
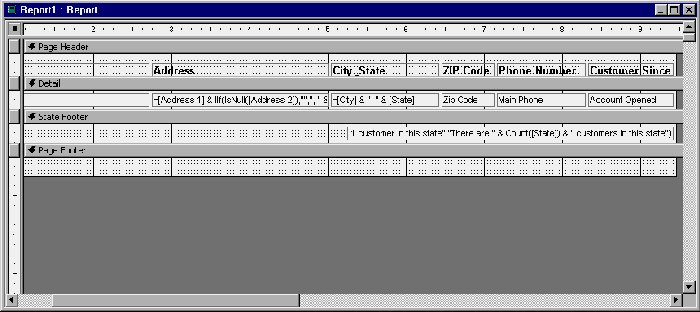
Figure 14-8 After adding the column heads.
There is still something uninspiring about the page header. In order to liven things up a bit, you should place a line under the column headers. The line will serve to separate the headings from the body of the report. To create the line, you use the Line tool in the toolbox. Select the line tool, and then use the mouse to define the line. Hold down the mouse button at one end of the line and release it when you have moved the mouse point to the other end. After you place the line, you can use the tools on the toolbar to specify the line's thickness and type.
Using Other Objects
You have a pretty good idea of how the Label and Text Box objects will print on a report, but it might not be quite clear how the other objects in the toolbox will print. For example, you may not know how a check box or a toggle button will print.
When you print a report, Access is quite literal. If you place a check box on the report grid, Access prints it on the report exactly like you placed it. The difference between the use of these objects on a report and a form is simple. On a form, these objects let you review and change data. On a report, the objects show the current state of your data.
Setting Up the Page Footer
Finally, you should add a page number to the report. Although there are a number of places a page number can appear, the bottom right corner of every page is very acceptable for this report (this is in the page footer area). Put a line at the top of the page footer area, and position a Text Box at the bottom right corner of the page. (You can again delete the Label object that Access always places with a Text Box.) Within this text box, place the following expression in the Control Source property:
= "Page " & [Page] & " of " & [Pages]
This expression results in the current page number and the total page numbers printing on every page (Page 1 of 13, Page 2 of 13, etc.). You can format the text with any font or point size you want. You should also align the text so it is at the right side of the text box. To justify the text at the right edge of the Text Box object, click your mouse on the Align Right tool. At this point, your Design window should look like that shown in Figure 14-9.
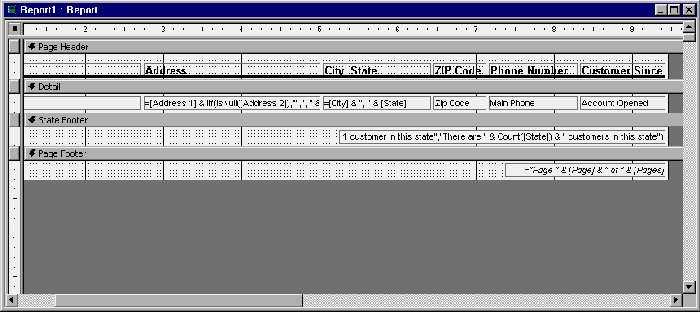
Figure 14-9 The completed report.
Setting Up the Page
Even though your report is essentially done, you have one more minor item to complete. You probably noticed that as you set up your report, each record required a fair amount of horizontal space to fit everything. If you look at Figure 14-9, you can see that according to the ruler at the top of the report Design window, the last field ends at just short of 9.5 inches. That is too wide for a report that is printed in portrait mode; you need to instruct Access to print the report in landscape mode.
To change the orientation of your page, simply choose Page Setup from the File menu. This displays the Page Setup dialog box. Make sure the Page tab is selected, as shown in Figure 14-10.
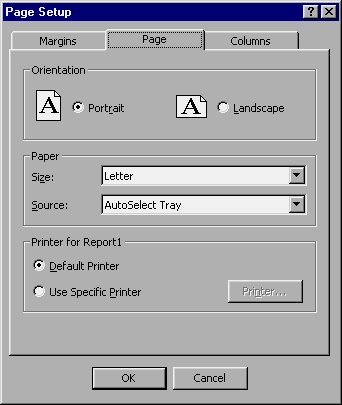
Figure 14-10 The Page Setup dialog box.
Click your mouse on the Landscape option button to inform Access how you want the report printed. You should also adjust the other settings in the dialog box, particularly the margins, to make sure that your 9.5-inch wide report will print on the page with no problems. You can then change the other settings, if desired. When you are done, click your mouse on the OK button.
Viewing Your Report
To take a look at how your report is turning out, click your mouse on the View button on the toolbar. Access displays what your report looks like in a manner that is very similar to print preview. Figure 14-11 illustrates a sample of how this report will appear.
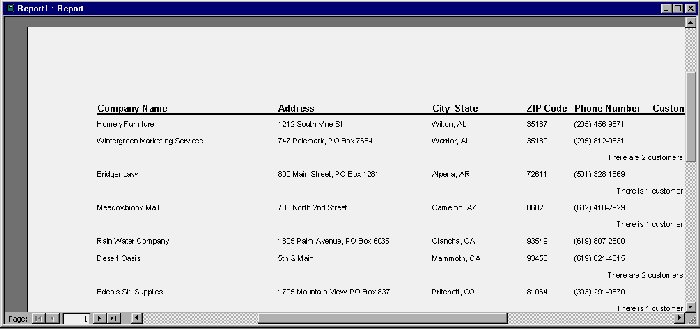
Figure 14-11 Reviewing the report.
When you are done reviewing the sample report, click your mouse on the View tool again to return to the Design window. Many people, as they design reports, will switch back and forth between the preview and Design windows to see how their design is progressing.
If you want to see what the report will look like when Access prints it, choose the File menu Print option. Specify a printer and other print specifications, as you learned to do in Chapter 8, "Creating Simple Reports." Access will send your report to your printer and will return you to the Design window. Figure 14-12 shows an example of the printed report.
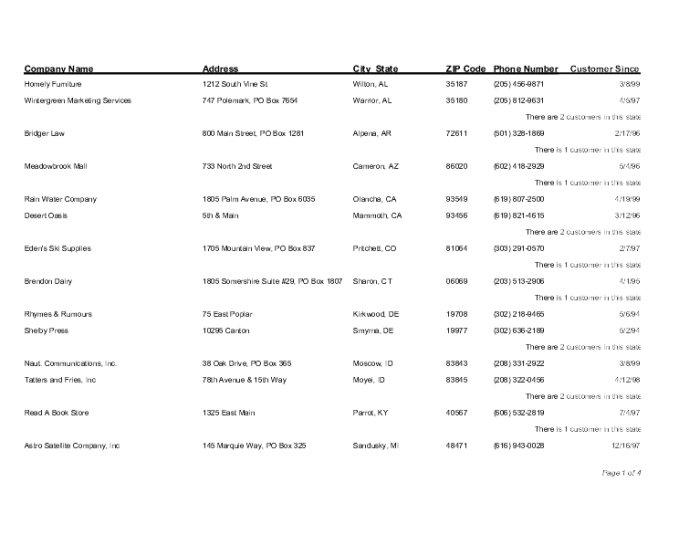
Figure 14-12 A printout of the report's first page.
Saving Your Report
When you are done creating or changing a report, you need to save it. When you close the report Design window, Access will ask you if you want to save your report. The effect of clicking your mouse on the Yes button varies, depending on whether you are editing or creating a report. If you are editing, Access saves your changes under the same report name as you used previously. If you are creating a report, Access will ask you to provide a report name, as shown in Figure 14-13.
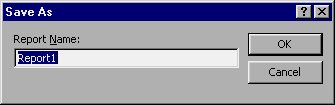
Figure 14-13 The Save As dialog box.
Type in a report name and select OK. Access will save the report, returning you to the Database window.
Note: Access saves reports in your database in the same way that it saves other database objects. Reports are an integral part of the database; Access does not save them in a separate file. You can see what reports are available with a database by selecting the Reports button in the Database window.
Learn Access Now! Chapter 13 Previous Section in Chapter 14 Next Section in Chapter 14 Chapter 15