Learn Access Now! Chapter 7 Previous Section in Chapter 8 Next Section in Chapter 8 Chapter 9
Chapter 8: Creating Simple Reports
(This is section 2 of 5 in this chapter)
Creating a Report
Note: This section uses the My Friends database you created in Chapters 2 and 3. If you do not have that database available, you may want to use the Friends 1.mdb database located on the CD-ROM. Copy the file to a directory on your hard drive and rename it My Friends.mdb.
To start the Report Wizard, first make sure that the Reports tab is selected in the Database window. Then, double-click your mouse on the Create Report By Using Wizard option. Access displays the Report Wizard dialog box, as shown in Figure 8-1.
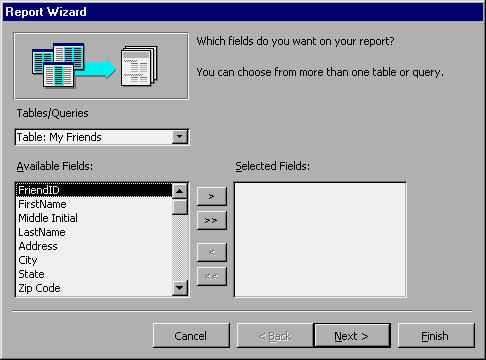
Figure 8-1 The Report Wizard dialog box.
At the left side of the Report Wizard dialog box, you can use the drop-down list to specify what Access should use as the source for this new report. Remember that you can use either tables or other queries as your data source. Since the My Friends database has only one table (the My Friends table), Access has already selected it for you. If you were working with a database that contained several other tables and queries, you could use the drop-down list to change what the Wizard uses as a data source.
Choosing Information to Include
In the lower-left portion of the dialog box is a list of all the fields defined in the selected table or query. If you change the data source in the pull-down list, then the available fields change, as well. You can use the list, and the controls just to the right of the list, to indicate which fields you want included in the report you are creating. Since this is a simple report, you might use the fields in this order:
- Last Name
- First Name
- Address
- City
- State
- Zip Code
- Home Phone
- Work Phone
To tell Access you want to use a field in your report, click your mouse on a field name (in the order shown here) and then click on the > button. Access will move the field from the left column to the right. Repeat this process until you have selected and transferred all the fields listed above. When you are done, click your mouse on the Next button. Access, in turn, displays the dialog box shown in Figure 8-2.
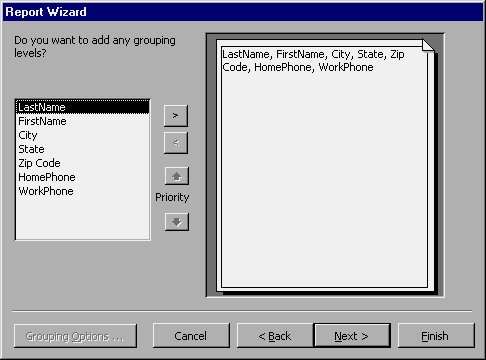
Figure 8-2 Picking which fields to group by.
Grouping Information
Your next step is to determine if you want your information grouped in any particular order. Grouping is routinely done in financial reports, although it is by no means limited to financial reports. For instance, if you were creating a report that showed sales for a particular company, you might want the information in the report grouped by month, by salesperson, or by territory.
In creating a simple report based on the My Friends table, grouping is probably not necessary. To show how it works, however, let's say you had a large number of friends in your database and you wanted to group them by state. To do this, simply choose the State field at the left side of the dialog box and click your mouse on the > button. The Report Wizard dialog box changes to show how your grouping will now occur, as shown in Figure 8-3.

Figure 8-3 Grouping helps you organize the output in a report.
Notice that the State field is moved to the top of the sample report layout, and the Grouping Options button becomes active. For some types of reports, you may want to change the grouping options. Doing so allows you to specify how Access should analyze the field by which you are grouping. In this case, changing the grouping options is not necessary.
To proceed to the next step, click your mouse on the Next button. Access displays the dialog box shown in Figure 8-4.
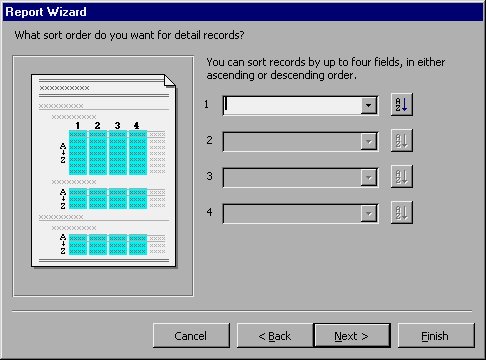
Figure 8-4 Picking which fields to sort by.
Sorting Information for Your Report
Now you need to decide how you want the information in your report sorted. Access allows you to specify up to four fields by which sorting can be done. In most instances you will use only one or two fields. It makes sense that if you are creating a list of your friends, you would want them in alphabetical order by name. Thus, you should choose the LastName and FirstName fields.
Use the pull-down list for the first sort field to select the LastName field. If desired, you can click your mouse on the order button to the right of the field to indicate whether Access should sort the field in ascending order (the default) or descending order. Now use the pull-down list for the second sort field to select the FirstName field.
When you are done picking the fields you want to sort by, you can click your mouse on the Next button to proceed to the next step. Access displays the dialog box shown in Figure 8-5.
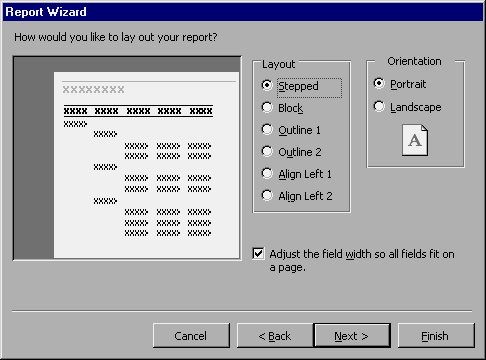
Figure 8-5 Determining a layout for your report.
Specifying Your Report Layout
Using the dialog box shown in Figure 8-5, you can indicate different options for laying out your report. The option buttons in the dialog box control different layouts. The best way to find out how you want your data to appear is to try the different buttons. Access changes the sample report to indicate how your information will appear.
Note that the controls in this dialog box have nothing to do with content, only with how the report presents the content you already selected. Besides picking a layout style, the dialog box also lets you choose an orientation for the report (portrait or landscape). Since there are a good number of fields to include in this report, you will probably want to use landscape orientation.
You also use this dialog box to indicate whether Access should limit the size of each field in the output. If the Adjust check box (bottom of the dialog box) is selected, Access may truncate some of your data. If you clear the check box, the data is not truncated, but it may not all fit on one line. For the purposes of this report, accept the default of allowing Access to adjust the column width. (Remember that you can always change the report layout later.)
When you are done, click your mouse on the Next button to proceed to the next dialog box, shown in Figure 8-6.
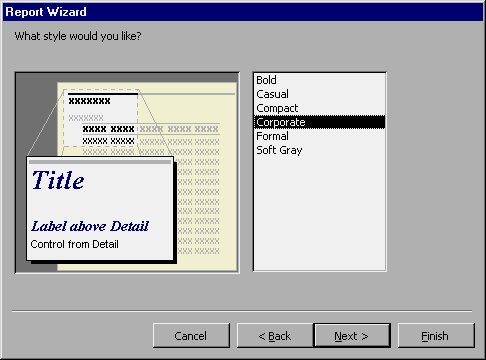
Figure 8-6 Picking a report style.
Here you have the opportunity to further define how you want your content to appear. Access provides six different predefined styles that determine report elements such as fonts, colors, lines, and the like. You can select each style, in turn, and see in the dialog box a representation of how your report will appear. Pick the one that you like the most, then click your mouse on Next. Access displays the final dialog box, shown in Figure 8-7.
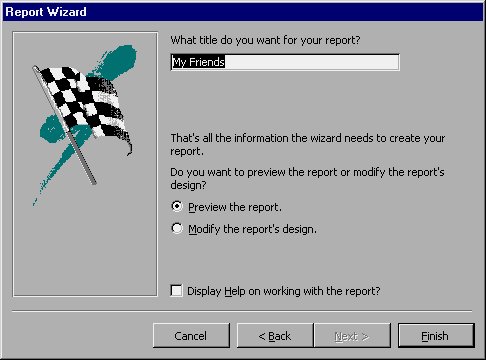
Figure 8-7 Finishing up the report.
Wrapping Up Your Report
You are almost done defining your report. In this final dialog box, Access asks you for a title to use for the report. This title is used in two places: at the top of each page in your printed report, and when saving the actual report in your database. Notice that the Wizard provides the same name as the table being used. In this case it is not a bad title, so you can leave it as is.
You are now ready to click your mouse on the Finish button. When you do, Access uses print preview to show you what your report will look like after it prints. This way you can see if you need to make any changes to the report design. Figure 8-8 shows how the report should look.
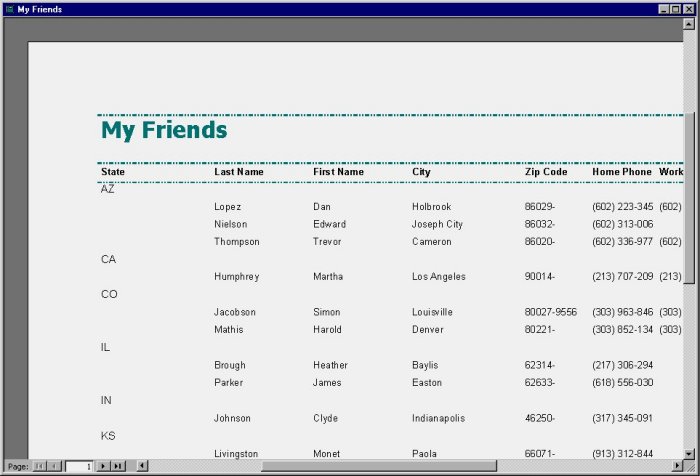
Figure 8-8 The finished report.
All in all, the Report Wizard creates a handsome report. There are a few changes you could make (such as narrower margins, changing the width of some fields), but overall the report is not bad. In Chapter 14 you will learn how to use the report Design window so you can create your own reports from scratch and make modifications to your existing reports (such as this one).
When you are done reviewing the report, close the print preview window by either clicking your mouse on the Close tool on the toolbar or on the Close icon (the X) in the upper-right corner of the window. Access displays the Design window for the report you just completed. (Again, the Design window is covered in Chapter 14.) You can close the design window by clicking your mouse on the Close icon in the upper-right corner of the Design window. You have now completed your first report in Access.
Learn Access Now! Chapter 7 Previous Section in Chapter 8 Next Section in Chapter 8 Chapter 9