Learn Access Now! Chapter 9 Previous Section in Chapter 10 Next Section in Chapter 10 Chapter 11
Chapter 10: Using Additional Tools
(This is section 3 of 5 in this chapter)
Analyzing a Table
Access includes a very powerful tool that you can use to analyze the data in one of your tables. The purpose of the analysis is to determine if there is a less redundant way to store the data in the table. "Less redundant" means that Access tries to remove any data that is stored in the table more than once. For instance, it may discover that a "company name" field should be pulled out of the original table and placed in a new table. Even though the result would be two tables (the original and a new table), the database would be more efficient since Information would not be duplicated in the original table.
An example is perhaps the best way to demonstrate the analysis process. The example in this section is based on the database Accounts.mdb, which is supplied on the companion CD. The database contains a single table, named Invoices, that has a bit over 1,000 invoices in it. A minimal number of fields are maintained in the table, but there is quite a bit of redundancy in the data.
Starting the Analysis
With the Accounts database loaded, click your mouse on the Tables button in the database window. Click your mouse on the Invoices table to select it. Then choose the Analyze option from the Tools menu. Access displays a submenu from which you should choose Table. Shortly Access displays the Table Analyzer Wizard, as shown in Figure 10-3.
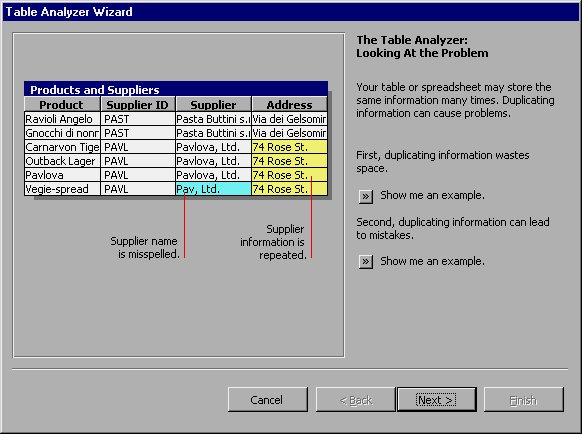
Figure 10-3 The Table Analyzer Wizard dialog box.
The first couple of screens in the Wizard are explanation of the purpose of the Table Analyzer Wizard. You can read through the information, if desired, clicking your mouse on the Next button whenever you are ready to proceed. Eventually (on the third dialog box) you come to the actual start of the action. This dialog box is shown in Figure 10-4.
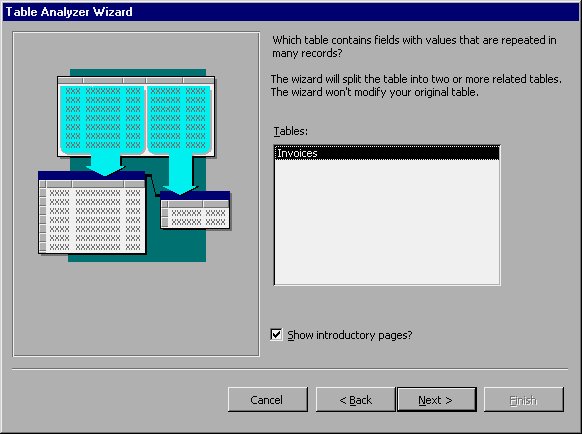
Figure 10-4 Selecting a table to analyze.
In many databases there may be more than a single table. Fortunately, this one only contains a single table named Invoices. Since this is the default table selected, click your mouse on the Next button. Access displays the dialog box shown in Figure 10-5.
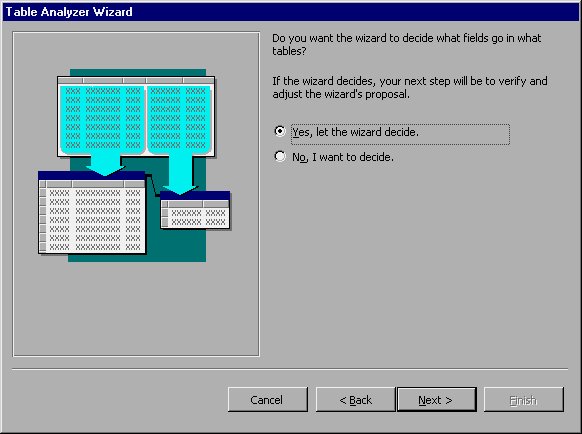
Figure 10-5 Letting Access do the work.
In this step you need to decide whether you want to let the Wizard decide which table fields should be moved, or you want to do it manually. Since the job of a Wizard is to make your life easier, go ahead and let the Wizard do the deciding. Even if the Wizard makes a bad choice or two, you can countermand the decision at the next step in the Wizard.
Confirming Table Splitting
When you are ready to proceed, click your mouse on the Next button. Access displays the dialog box shown in Figure 10-6.
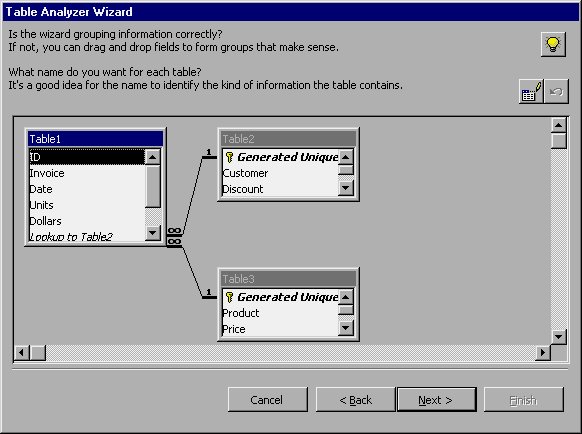
Figure 10-6 Verifying the table splitting.
Note: The Table Analyzer Wizard sets up relationships between tables. You will learn more about how relationships work in Chapter 13, "Understanding Data Relationships."
At this point, the Wizard is showing you what it is proposing to do. In the case of the original Invoices table, the Wizard is proposing splitting it into three tables. Looking at the fields it suggests moving to each table, it is easy to see that one will contain invoice transactions, another customers, and the third products. Using this dialog box, you have the opportunity to name each of the tables.
To see how this works, make sure Table1 is selected (it is in Figure 10-6). Then click your mouse on the Rename button, as indicated near the upper-right corner of the dialog box. Access displays a small dialog box that allows you to specify a new name for the table. In the case of Table1, the name should be Invoice Transactions. Enter this, then click your mouse on the OK button. Access updates the name shown in the title bar for the table to your new name.
You should repeat this same general process to name both Table2 and Table3 to Customers and Products, respectively. Click your mouse on the title bar for each table, and then rename it. When you are done, the tables should appear as shown in Figure 10-7.
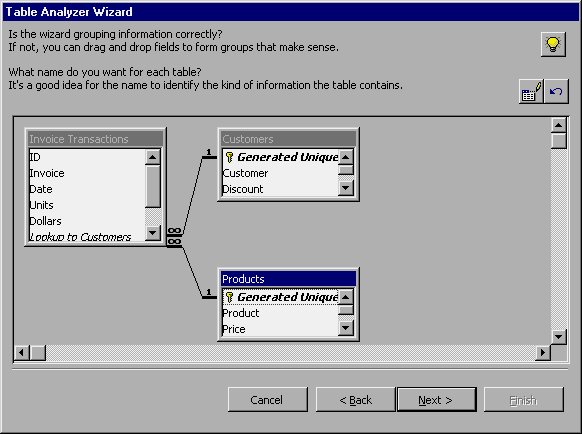
Figure 10-7 The tables have been renamed.
The other thing you can do in this dialog box (besides naming the tables) is to override how the Wizard has split the tables. When doing an analysis like this on your own tables, you will want to make sure that each proposed table contains the relevant fields from the original table. In the case of this example, the Wizard did a very good job of making the decisions. For instance, it figured out that what we have named the Customers table should contain a unique customer ID, as well as the customer name and discount.
If you needed to override the Wizard's splitting decisions, all you need to do is click your mouse on a field name and drag it from one table to another. No such dragging is necessary in this example, however.
Confirming Primary Key Selections
When you click the mouse on the Next button, Access displays the next step of the Wizard, as shown in Figure 10-8.

Figure 10-8 Setting primary keys.
This dialog box looks remarkably similar to the one used in the previous section. The difference, however, is in the control buttons at the top of the dialog box. The Wizard is asking you to confirm that each table has a primary key defined. The primary keys for the Customers and Products table are fine; they were created by the Wizard. However, the Wizard has somehow forgotten that the ID field should be a primary key in the Invoice Transactions table.
To specify the ID field as a primary key, first click your mouse on the field name. Then click the mouse on the tool that has the key on it. Access responds by placing a small key to the left of the ID field in the Invoice Transactions table.
Correcting Typographical Errors
When you click your mouse on the Next key, the Wizard analyzes the data in the proposed tables and displays what it may believe are typographical errors. Access does this for each new table being created by the Wizard. Since two new tables (Customers and Products) are being created by the Wizard in this example, this means Access displays two typographical correction dialog boxes. The first of these is shown in Figure 10-9.
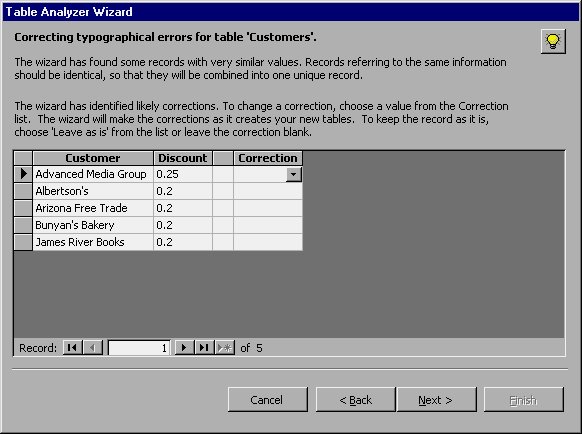
Figure 10-9 Correcting typos in the Customers table.
Here the Wizard has displayed five customer names it believes may be mistyped. It figures this out using an internal algorithm. If the spelling of the data is close enough to other data in the table, then it is flagged as a potential error. All you need to do is use the pull-down list in the Correction column to select either a correct spelling or the (Leave As Is) setting.
Note: If you are analyzing a large table that has been worked on by many people over a long time period, it is very possible you will have many misspellings in the file. Make sure you take the time to go through the necessary corrections in this step; it is easier than tracking down mistakes later.
In the case of this example Customers table, there are no misspellings. You should change the Corrections column for all five records so the (Leave As Is) setting is selected. When you have done this, click your mouse on the Next button. The Wizard then displays the potential corrections for the Products table, as shown in Figure 10-10.
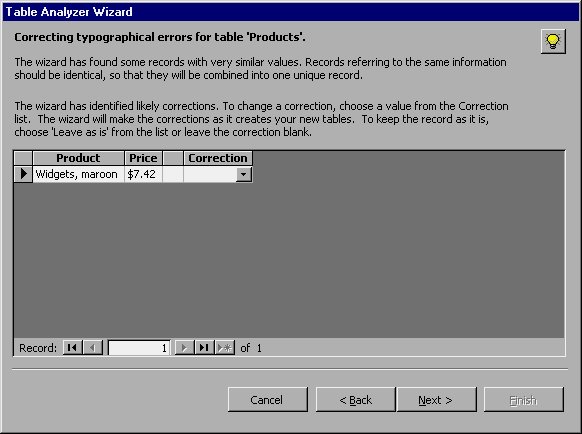
Figure 10-10 Correcting typos in the Customers table.
It just so happens that there is only one record identified as a possible error in this step. In your own tables, of course, there may be more. You go through the correction process exactly as you did for the Customers table. In this case, you select the (Leave As Is) option for the single record shown.
Finishing the Analysis
When you click your mouse on the Next button, the Wizard displays its final step, as shown in Figure 10-11.
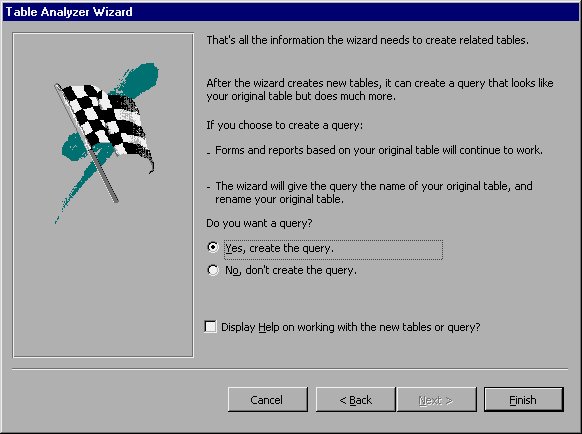
Figure 10-11 The final analysis step.
The final step of the Table Analysis Wizard is where you specify if you want to create a query that looks like your original table. In this case, it means that the Wizard would create a query that is an amalgamation of the three tables, combined to look like the original Invoices table.
Whether you create a query is up to you. In this instance, it doesn't hurt, so you can click your mouse on Finish to complete the analysis process. Shortly Access displays the new query on screen, as shown in Figure 10-12.
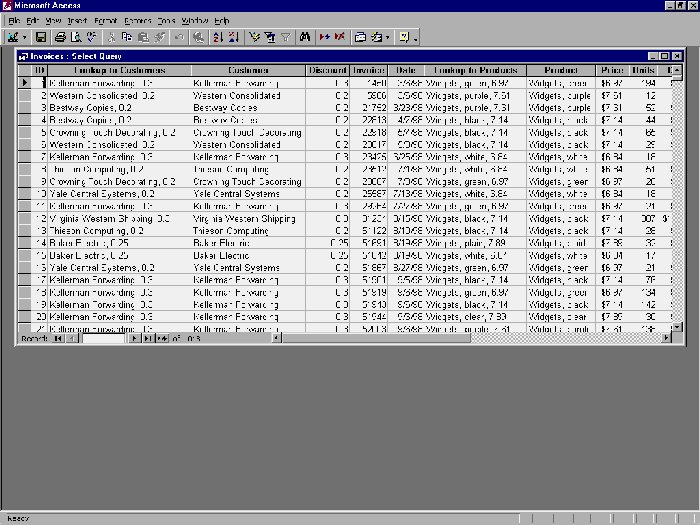
Figure 10-12 The new query created by the Table Analysis Wizard.
Notice that there are some odd-looking fields in the new query. In this case, the Lookup to Customers field and the Lookup to Products field seems a little odd. In reality, these are nothing but the links that the Wizard established between the Invoice Transactions table and the other tables. You can easily turn these off by editing the query (as described in Chapter 6, "Using Queries to Examine Your Data") to not display the field.
Learn Access Now! Chapter 9 Previous Section in Chapter 10 Next Section in Chapter 10 Chapter 11