Learn Access Now! Chapter 6 Previous Section in Chapter 7 Next Section in Chapter 7 Chapter 8
Chapter 7: Printing Your Table
(This is section 2 of 5 in this chapter)
Controlling the Printed Page
Access, like many programs, takes full advantage of the Windows environment. Access uses the printing facilities provided by the Windows environment, which means it can use any printer Windows can use. While you cannot add or delete printers within Access (this is done from Windows itself), you can control to which printer Access sends your information and which features of that printer Access uses. To control Access printer operations, you use the Page Setup dialog box.
You can get the Page Setup dialog box from many different places in Access. Any time you are getting ready to print, there is normally a tool or menu option that will let you view the Page Setup dialog box. In most cases, however, you will get to the dialog box by selecting the Page Setup option from the File menu. The Page Setup dialog box is shown in Figure 7-3.
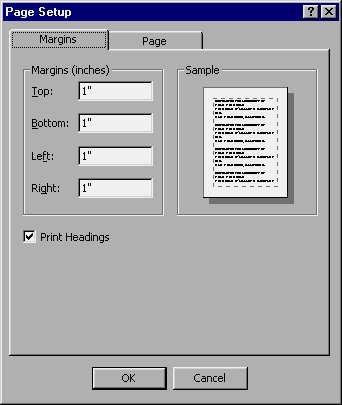
Figure 7-3 The Page Setup dialog box.
The following sections discuss the various parts of this dialog box in detail.
Setting Printout Margins
The first of the two tabs available in the Page Setup dialog box is Margins (see Figure 7-3). Depending on the data you are printing, you may need to change the default page margins. Margins are the white space left at each side of your paper. The Margins tab of the Page Setup dialog box lets you control how much of a margin you want left on your printed page. To set a margin, simply change the setting shown for each of the four margins.
The default margins are 1" on each side of the paper. You can change these margins to any logical value you desire; simply select the box whose margin you want to change, and type in a new one.
Note: Some printers require a certain margin. For instance, some laser printers cannot physically print within a quarter-inch of the paper's edge. In these instances, Access will not allow you to change the margins to less than the physical limitations of the printer.
Setting Page Specifications
Using the Page tab of the Page Setup dialog box (see Figure 7-4), there are numerous ways you can change how Access actually puts information on the physical page.
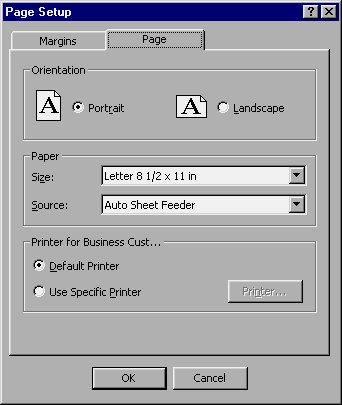
Figure 7-4 The Page tab of the Page Setup dialog box.
Note: The options available in the Page Setup dialog box will depend, in large part, on your printer type. If some setup options are not available to you, don't worry. Because of the printer you are using, you probably have options available that other users don't have.
The first setting you can specify in the dialog box is the orientation of your paper. Actually, this is a bit of a misnomer. The paper itself is not oriented; it is the image created by Access that is oriented in relation to the paper. To select landscape or portrait orientation, use the settings in the Orientation area, at the top of the dialog box.
Printed materials typically use a portrait orientation. This simply means that when you are reading the paper, the narrow side is at the top and bottom of the page. If you turn the page 90° to the left or right, the page is in landscape mode--the narrow side is at the left and right sides of the page. Landscape mode is handy when you are printing tables that have many columns in them.
If your printer supports multiple paper sizes, such as standard and legal sheets, you may need to select the paper size you desire. To select a paper size, change the information in the Paper area of the dialog box. Depending on your printer, you may be able to change both the size and source of the paper. (There are controls for each of these in Figure 7-4.) You should select the paper size and source that makes the most sense for the type of output you want to create.
Changing Your Printer
A printer driver is special software that Windows uses to communicate with your printer. Most printers require their own special software (in other words, their own printer driver).
It is not unusual to have several Windows printer drivers installed in your system. Many people have at least two printers, such as an ink jet and a laser printer. Others will have even more drivers installed so they can use their friends' printers. For instance, if someone else in your company has a high-resolution laser printer, you might have a printer driver installed for that printer, even if you don't have direct access to the printer. Instead, you can send the output to a file and then physically take the file to the other printer to print the output.
Access lets you select any printer whose driver has been installed in Windows. In short, selecting a printer driver tells Access which printer you want to use. You select a printer driver in the Printer area of the Page tab of the Page Setup dialog box. (See the bottom of Figure 7-4.)
You will normally select the Default Printer setting. With the Default Printer setting, Access uses the printer you have setup as the default printer in Windows. You can, however, select a different printer by choosing the Use Specific Printer option button. The Printer button then becomes active and you can use it to select the printer you want to use. When you click your mouse on the Printer button, Access displays a new Page Setup dialog box that allows you to specify the printer you want to use. (Why the same name is used for two dialog boxes is a mystery.) See Figure 7-5 for an example of this dialog box.
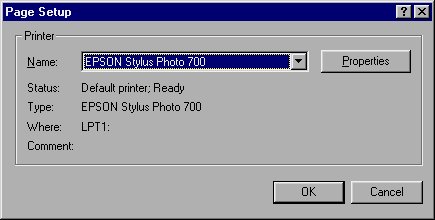
Figure 7-5 The Page Setup dialog box.
The pull-down list at the top of the dialog box shows the name of each printer connected to your PC, as well as the names of the printer drivers you have installed. Regardless of which printer you choose, Access will remember your choice and use that printer until you select another.
You may have noticed that this second Print Setup dialog box (Figure 7-5) is similar to the top of the Print dialog box (Figure 7-1). Access allows you to specify which printer you want to use in both locations. Changing the printer in one dialog box is the same as changing it in both of them.
Note: Changing your printer will affect the options available in the various Page Setup areas of Access. Generally, Access only displays setup options applicable to the current printer. Don't worry if your setup dialog boxes change when you change printers.
When you are done specifying the printer you want to use, click your mouse on the OK button. You can then continue to set other print options, as desired.
Controlling Printer Properties
There are hundreds (if not thousands) of different printers on the market. This is one reason that Windows requires printer drivers in order to communicate with a particular printer. To complicate matters, each of those printers has different capabilities. For instance, different printers will handle different types of paper. Some printers can print in color. Other printers offer different options for printing graphics. The list is endless.
Access allows you to change the specific properties used by a printer. You can do this by clicking your mouse on the Properties button in either the Print dialog box (Figure 7-1) or the Page Setup dialog box (Figure 7-5). Access displays the Properties dialog box for a printer. The actual appearance of this dialog box varies completely, depending on the printer you are using. Figure 7-6 shows an example of the Properties dialog box for the Epson Stylus Photo 700 printer.
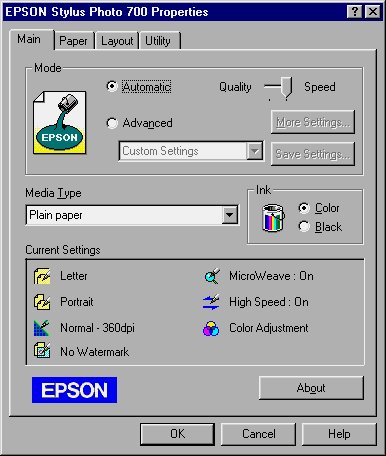
Figure 7-6 The Properties dialog box for the Epson Stylus Photo 700 printer.
This particular printer is a color ink-jet printer. Thus, many of the controls in the Properties dialog box are used to specify how color should be printed on the page. Other controls allow you to specify the trade-off between quality and speed. Still other tabs allow you to indicate other ways in which the printer should be used.
To provide a contrast, take a look at Figure 7-7. It shows the Properties dialog box for an HP LaserJet printer. Notice that the controls in this dialog box are completely different from those in Figure 7-6. This is, again, because the capabilities of the two printers are completely different.
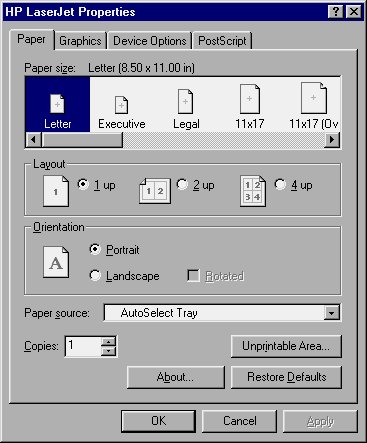
Figure 7-7 The Properties dialog box for an HP LaserJet printer.
The controls in the Properties dialog box for the HP printer allow you to put multiple images on a single sheet of paper and control other printer features.
Most of the time you won't need to fiddle with the settings in your printer's Properties dialog box. Instead, you will typically use the default settings determined by Windows. You should understand that the dialog box is available, however, as using it is the primary way you have to take advantage of advanced printer features. The best way to find out what the controls do in your printer's Properties dialog box is to experiment a bit. You won't hurt the printer, and you may discover new and exciting ways to utilize the features inherent in the printer.
Learn Access Now! Chapter 6 Previous Section in Chapter 7 Next Section in Chapter 7 Chapter 8